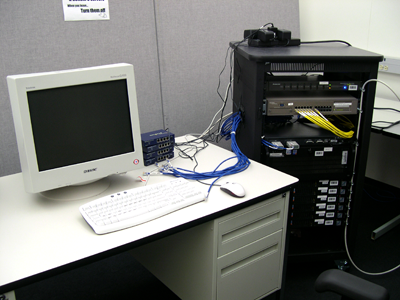
Figure 1: Station 1
The goal of the labs is to obtain hands-on experience in network
configuration and administration. Student work in groups and must
carry out lab experiments and produce lab reports. Groups are
necessary because of limited equipment and time. The teaching lab is
located in DC 2569 (may be labelled as DC 2564 on some of the older
wall maps in DC). Each student group can reserve a 22-hour time slot
to perform the lab experiments. The labs are based on the following
book:
Mastering Networks - An Internet Lab Manual
Jörg
Liebeherr and Magda El Zarki
Addison Wesley 2004
Copies of the book are on reserve in the library with call number UWD 1422. This document describes the available infrastructure (which differs in some details from the one described in the book) and general procedures for carrying out the lab experiments. A separate document provides detailed instructions and notes for each lab experiment. Hardcopies of all relevant material are also available in the teaching lab. Any markings on these hardcopies have been done by other students and should not be treated as authoritative.
The teaching lab is open 22 hours a day, 7 days a week. The key code for DC 2569 is available to registered students through UW-ACE. There are two stations for conducting lab experiments. Each group must reserve a 22-hour time for each lab experiment. The time slots run from 9am to 7am on the next day. Slots will be reserved on a first-come/first-serve basis. For each time slot, a customized password will be sent to the holder of the reservation. Do not enter the teaching lab without a reservation. You will not be able to access the machines without a valid password. Each day, during 7am and 9am, the machines go into maintenance mode. Please leave the lab during this time. Keep the doors locked and lights turned off whenever you leave the room.
IMPORTANT: The general MFCF/CSCF Lab Use Policy applies to the teaching lab in DC 2569, as well.
At the specified time, the registration site (requires UWdir credentials) will be available for slot reservation at https://www.student.cs.uwaterloo.ca/~cs456/456lab/student/
Lab slots can be reserved for weekend days, but keep in mind that technical support will be limited during weekends. However, due to the limited number of slots available, it might be helpful, if some groups reserve weekend slots. Please see Communication for further details.
The lab experiments involve hooking up computers with various network devices and setting up different services and configurations. This section describes the equipment in the lab. The setup described in the Liebeherr/El Zarki book has four PCs and four routers. In our lab, however, there are six PCs and one router per station. Two of the routers mentioned in the book are effectively replaced by the extra two PCs. The PCs are labelled PC1 to PC6 in each station.
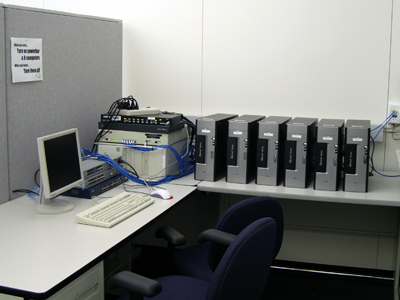
Figure 1 and 2 below show the physical setup of the lab.
|
|
|
Figure 1: Station 1 |
|
|
|
Figure 2: Station 2 |
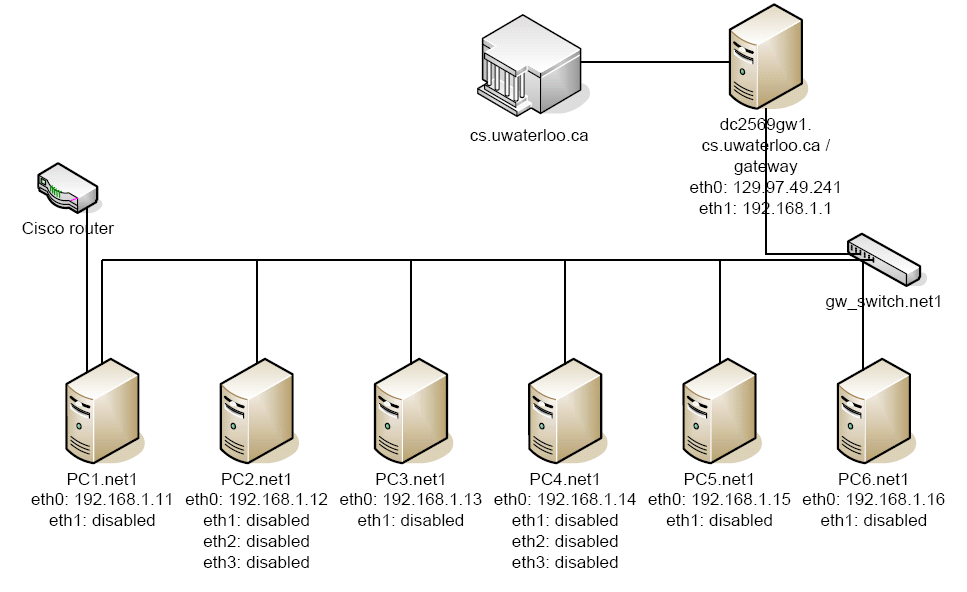
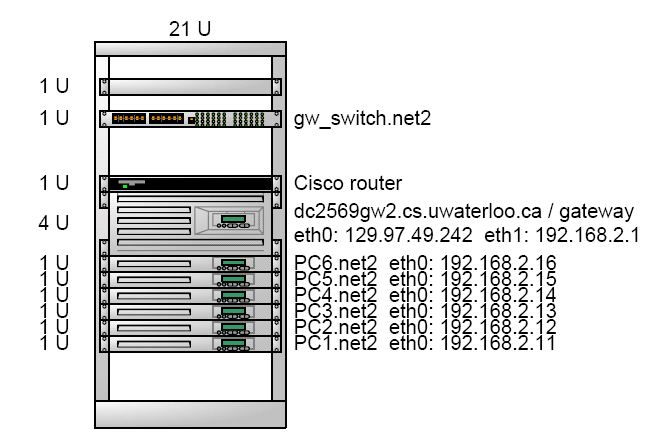
In contrast to the setup described in the Liebeherr/El Zarki book, the UW setup has an additional administrative network, which is used for installation and maintenance. In particular, the interface eth0 is part of the administrative network on each PC and not part of the experimental network. The configuration of the administrative network is not part of the lab experiments and must stay unchanged. Figure 3 and 4 illustrate the administrative network setup. Note that there are two stations in the lab. They have the DNS names net1 and net2 and have the subnet 192.168.1.0/24 and 192.168.2.0/24 respectively. The two stations have physically different hardware. However, the lab instructions apply to both of them without major differences.
|
|
|
Figure 3: Equipment and administrative topology of Station 1 |
|
|
|
Figure 4: Equipment placement of Station 2 |
Table 1 lists the name of the PCs; as well as the Internet
Protocol (IP) and Medium Access Control (MAC) address of the
associated network interface cards (NICs). This table is included as
extra information. It is not needed for the lab exercises. The lab
exercises require you to have root access to the PCs. The root
password (the password for the user 'root') is sent to you via email
when you reserve a time slot. You can also lookup your password at
the time slot request page. The machines run Fedora Core 3 with a
limited number of packages. Gnome, VIM and Emacs are installed by
default. When you run X, the "Red Hat Network Alert Notification
Tool" will want you to upgrade the system. You do not need to worry
about updating packages unless otherwise mentioned. The lab exercises
have been done on these machines without additional updates and/or
packages.
Network cards 0 (eth0) of
all the PCs are connected to the admin network. The admin network is
for maintenance purposes and connectivity to the Internet and thus
is not part of the lab activities. You will not be using this NIC in
the lab experiments. The remaining network interfaces, in combination
with the other networking equipment (router, switch, and hubs)
comprise the part of the lab that you use and modify for the lab
experiments.
Data stored on the PCs is removed each morning at 7am
when your time slot is up. Therefore, do not use these machines as
permanent storage. You can transfer data to and from your student.cs
account via ftp, scp, sftp or the mywaterloo portal to name a few.
|
Table 1: IP and MAC addresses for all the PCs |
|||||||
|
Name |
NIC |
IP |
MAC |
Name |
NIC |
IP |
MAC |
|
PC1.net1 |
eth0 |
192.168.1.11 |
00:0E:A6:42:32:3C |
PC1.net2 |
eth0 |
192.168.2.11 |
00:30:48:81:bf:0c |
|
PC2.net1 |
eth0 |
192.168.1.12 |
00:0E:A6:42:36:D9 |
PC2.net2 |
eth0 |
192.168.2.12 |
00:30:48:82:d6:08 |
|
PC3.net1 |
eth0 |
192.168.1.13 |
00:0E:A6:42:36:DC |
PC3.net2 |
eth0 |
192.168.2.13 |
00:30:48:82:cc:24 |
|
PC4.net1 |
eth0 |
192.168.1.14 |
00:0E:A6:42:36:BC |
PC4.net2 |
eth0 |
192.168.2.14 |
00:30:48:82:81:80 |
|
PC5.net1 |
eth0 |
192.168.1.15 |
00:0E:A6:42:36:D7 |
PC5.net2 |
eth0 |
192.168.2.15 |
00:30:48:82:d4:5a |
|
PC6.net1 |
eth0 |
192.168.1.16 |
00:0E:A6:42:36:13 |
PC6.net2 |
eth0 |
192.168.2.16 |
00:30:48:81:c2:ac |
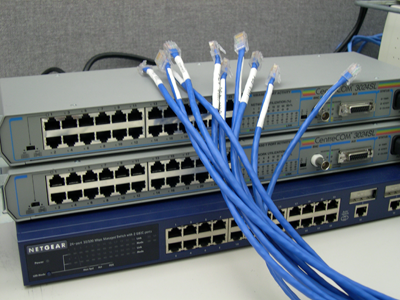
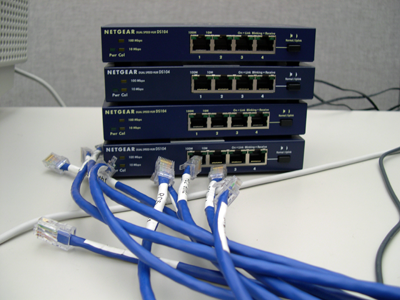
There are three hubs or switches per station (Figure 5 and 6). They are located on the desk next to the monitors. You can assume that the switches work the same way as hubs. These hubs/switches are for you to use for the lab experiments. You can plug the Ethernet cables next to them into these hubs/switches. The Ethernet cables are labelled with the PC numbers and NIC numbers (e.g. PC1 eth1), or Cisco Ethernet0/1. They are all straight-through cables.
|
|
|
Figure 5: Switches at Station 1 |
|
|
|
Figure 6: Hubs at Station 2 |
The KVMs located at each station switch between the 6 PCs. Button 1-6 are for PC1 - PC6, while Button 8 is for the gateway. For Station 1, you can type Ctrl Ctrl PC# (e.g. Ctrl Ctrl 1 for PC1) to switch to a PC. For Station 2, Ctrl Ctrl presents an on-screen menu which you can use to choose a PC. These shortcuts have the same effect as pushing the buttons on the KVMs.
The gateway PC is NOT related to the lab experiments. It is part of the admin network and is there for maintenance purposes. Please LEAVE IT ALONE and LEAVE IT RUNNING at all times.
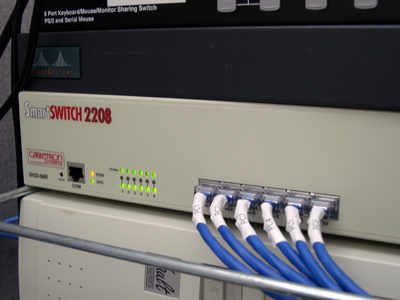
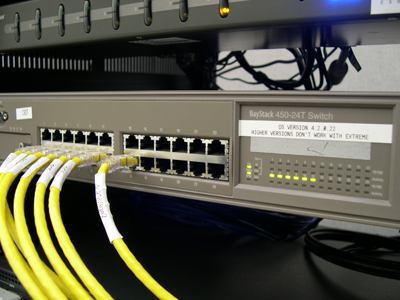
The gateway switch (Figure 7 and 8) connects the gateway to the PCs. The lab experiments do NOT involve changing its settings. Please do NOT change its configuration or unplug cables from it.
|
|
|
Figure 7: Gateway switch at Station 1 |
|
|
|
Figure 8: Gateway switch at Station 2 |
The Cisco routers in the lab are the Cisco 2500 series, running version 12.2(7a) of the Internet Operating System (IOS). Each station has one of these routers. You will be connecting and performing configurations with the router. The console line of the router is connected to COM1 of PC1.
After a fresh installation, the PCs are configured with a static routing entry to the UW network (129.97.0.0/255.255.0.0) via gateway.net1/gateway.net2 in the routing table of every PC. With this route entry, you will be able to access the UW network, but not the Internet outside UW. To access the general Internet, you will need to set the default gateway to gateway.net1 or gateway.net2 on the PC from which you want to access the Internet, depending on which station you are at. To set the default gateway, issue the following command:
route add default gw gateway.net1 (or 2 for Station 2)
Some lab experiments require configuring the default gateway. In that case you must remove the original default gateway if you added one, by issuing the following command:
route del default
Bear in mind that you can have at most one default gateway on a PC. Multiple default gateways will confuse the networking software and is the source of many problems.
The teaching lab has a system in place to install a fresh copy of the operating system each morning at 7am. This is necessary because the lab exercises involve changing key configurations and may leave a machine in an unknown state. The customized password is also set at that time. The process is generally stable, but occasionally fails. Section Troubleshooting below explains ways to recognize failure and restart the installation procedure manually. The following lists provide detailed instructions for starting and finishing the lab experiments.
Check your email for machine password and for last-minute announcements. Also check UW-ACE for announcements.
Locate your assigned station in DC 2569: Station 1 (on the right in the lab) or Station 2 (on the left).
For Station 1, ensure the power bar is turned on, thus providing power to the monitor, switches, etc. For Station 2, power should already be available for all equipment.
Turn on the monitor.
Ensure the gateway is turned on by inspecting the Power LED. If the gateway is initially off, refer to 1. in Troubleshooting.
The PCs for your station should be off when you enter the lab. Switch the KVM to Position 1 and power up PC1. A welcome screen shows up asking whether to continue booting or reinstall the machine. If the PC boots up without showing the welcome screen, its network connection to the gateway is not functioning properly. In this case, consult 1. in Troubleshooting.
Press ENTER at the welcome screen to continue booting. Immediately after pressing ENTER, the first line on the screen shows the last time the machine was installed. Ensure the time shows the current date, and the time is after 7am. If the date is not current, the PC is likely not in a fresh state and your customized password cannot be used to gain access. In this case, see 5. in Troubleshooting.
Wait for the login screen and enter the user name 'root' and the password given when reserving the time slot. If the password does not work, double-check the previous steps again and consult Troubleshooting. If problem persist, contact the course staff as per Communication.
Boot up PC2 to PC5 by following the same steps listed above.
If the time stamp on PC1 was old at Step 7, reboot the router following the procedure in Router Reboot, to make sure any old settings are purged.
When connecting to the router via kermit (see Lab book for details) and the router does not show the correct prompt router>, reboot the router using the procedure in Router Reboot.
Shut down PC1 to PC6 by issuing the command poweroff or tap the power button lightly. Do not shut down the machines by holding down the power button.
Unplug the Ethernet cables your group plugged in. Do not unplug the cables from the back of the machines nor the cables plugged into the gateway switch.
For Station 1, turn off the power bar. For Station 2, turn off the monitor.
Leave the gateway turned on.
Turn off the lights if no one else is in the lab.
If the router shows an empty prompt such as >, it may not have been reset properly and needs to be rebooted.
Connect to the router via kermit if not already connected.
Turn the router's power off (a switch near where the wires hang out), wait for 10 seconds and then turn it on.
Monitor the kermit terminal and see the IOS loading.
If the router asks whether to enter the initial configuration, type 'no' and press ENTER.
If the router asks whether to terminate installation, type 'yes' and press ENTER.
The router should continue with the default settings and output a number of messages.
After you see the messages, press ENTER to see whether the prompt is back. You will see the router> prompt after hitting enter if the router has finished rebooting.
If a PC is not in a clean state, it may require manual installation.
Reboot the machine to see the welcome screen. If the welcome screen does not appear, refer to 1. in Troubleshooting.
Type 'reinstall' at the prompt instead of hitting ENTER. This starts the installation process. No user input is required until the machine is fully installed. This process takes 3-5 minutes. You should be able to login using the password given to you when the installation has been completed successfully.
Note that ALL DATA stored on that PC will be LOST after reinstallation.
Do your homework! Much of the lab experiments is about adequate preparation. Chapter 1 of the lab book explains different ways to wire up the equipment in the lab. Reading it in advance should solve many connectivity problems and save your sanity during lab time. For those who have limited experience in Linux, you may find the learning curve to be quite steep. Chapter 2 of the lab book. titled "An overview of the Internet lab software" will help bring you up to speed.
You should read the lab exercises ahead and formulate expected solutions. Use the lab time only for testing the expected solutions and make changes if necessary. You may not have enough time in the lab to start and finish all the readings and exercises. Multi-tasking among group members is essential to complete the lab exercises in a timely manner.
Keep in mind that the equipment in our lab slightly is very similar to the equipment described in the book, but differs in some details. When encountering problems, keep in mind that the lab experiments have been conducted many times in previous terms without problems.
The following section describes the symptoms of certain failures and the appropriate action to be taken. Note that the state of each PC is independent of one another. You need to check the state of each PC when starting them up. If these steps do not resolve your problem, contact the course staff as per Communication.
When I turn on the PC, the
welcome menu does not show up.
This is caused by the PC being
disconnected from the gateway.
If the gateway is not originally running, there is a good chance that none of the PCs have been reinstalled. Turn on the gateway, wait for 3-5 minutes for it to fully boot up, and then follow the procedure Manual PC Installation.
If the gateway is originally running, the cable connection between the gateway and the PC may be loose. Check that they are connected by checking the LEDs on the gateway switch. If any LED for the PCs or gateway is off, plug in the cable firmly. Check both ends of the cables. If the LEDs still does not light up, check that the gateway switch is on. If all fails, there may be an equipment failure. If the connection between the gateway and PC can be established, follow the procedure Manual PC Installation.
The welcome menu shows up, but
when I hit ENTER, the OS does not boot up.
The OS is likely
corrupted. Reboot the machine and follow the procedure Manual
PC Installation.
When I enter the lab, the PC is
already running, and there is a BIOS message (such as S.M.A.R.T.
warning).
Follow the on-screen instructions to get pass the
warning. Then when the welcome screen appears follow the procedure
Manual PC Installation.
When I enter the lab, the PC is
already running, and there are error messages scattered across the
screen. One of the error messages suggests the Fedora installation
has failed.
The installation process aborts abnormally
sometimes. Reboot the machine and follow the procedure Manual
PC Installation.
The PC boots up and the login screen appears. However, the password given to me does not work.
If the installation time stamp correctly shows today's date, there may be problems with retrieving the password correctly. Try a few times to make sure you did not type the password wrong or mistakenly typed 1 (one) as l (letter L) or vice versa. If all fails, contact the course staff as per Communication.
If the installation time stamp is old, reboot the PC and follow the procedure Manual PC Installation.
If you are not sure whether the PC has been reinstalled properly (by inspecting the installation time stamp), reboot the machine and follow the Startup procedure closely.
I cannot connect to the
Internet
To access the Internet outside of UW, you need to
configure the default gateway (see
Routing Table).
Make sure the only default
gateway is gateway.net1 (or 2 respectively) and try again.
You should always be able to access the UW network
(129.97.0.0/255.255.0.0) unless there is a physical disconnection.
You only need to inspect cabling, etc., if there is no
connectivity to the UW network after a reboot and
after a reinstallation of the PC in question!
If you cannot
connect to the UW network, locate the gateway cable
(labelled as dc2569gw1 or 2 respectively) near the gateway switch
and make sure that the cable is plugged into the switch and the
light on the switch for that port is on.
If the light is off: For Station 1, if the light does not light up, ensure that the switch next to the cable is at the X position (for cross-over). For both Station 1 and 2, if the light is still off, check whether the gateway machine is on (KVM port 8), and whether the other end of the cable is plugged into the gateway.
If the light is on: Check that the other end of the cable is plugged into the PCI Ethernet card (i.e. not the onboard Ethernet port) at the gateway. Also check that the onboard Ethernet port is connected to port A01 on the wall for Station1 and A02 for Station 2 (both wall jacks are located at Station 1).
The routing table / configuration file(s) is a
mess
Rebooting the machine will usually clear the routing
table and interface settings to defaults. If this still does not
work, you can perform a clean install of the operating system as
described in Manual PC Installation.
Note that ALL DATA stored on that PC will be LOST after
reinstallation.
General lab-related questions should be sent to the lab discussion forum in UW-ACE or, if necessary, to the lab TA or the instructor. For immediate technical assistance while in the lab, after having thoroughly checked all available information, send email to the course account cs456@student.cs with the subject CS456 Lab (exact spelling required). Only in urgent cases (especially outside business hours) use the subject URGENT - CS456 Lab (exact spelling required) in the subject line to increase the change for a timely response. We cannot guarantee any fixed response time. However, if a genuine technical problem prohibits a group from completing a lab, especially during a weekend slot, we will make alternative arrangements (e.g. another time slot).
The MEFnet lab infrastructure has been supported by the Math Endowment Fund and the School of Computer Science through teaching grants.