

Matthew Robertson
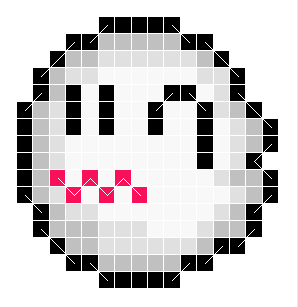
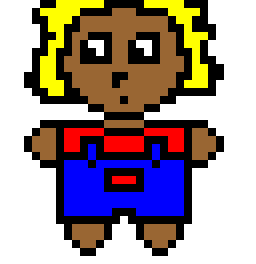
For my project, I chose to upsample Pixel Art images using Bicubic Tensor Product Bezier Spline Surfaces. Representing images in this way allows me to manipulate the Control Points in useful ways to further refine the image details. Pixel art images specifically are interesting and challenging because every pixel matters, hard edges, corners, and they are generally very small.
I was inspired by the paper Depixelizing Pixel Art by Johannes Kopf and Dani Lischinski. In that paper, they vectorise the images, remove ambiguities, and smooth the images by fitting Bezier splines to the shapes. Their results are quite good, but use much more than just Bezier splines. Although my method is quite different, I got my ideas from there and compare my results to theirs.
For my core I made a general construction for representing images as bicubic splines and use that to scale them.
A naive place to start is to simply make every Pixel (represented by its Red, Green, and Blue values) represent a control point. This has very obvious problems, such as only interpolating every third pixel. It has several other problems, for example images where the width and height are not multiples of three, and the fact that two pixels of the same colour at different index locations may be shown differently. A good representation should interpolate every single pixel, work for any sized image, and the same shape at different areas of the image should come out the same.
To interpolate every pixel, I use knot multiplicity three and set the control point C_3x,3y equal to the pixel P_x,y for all pixels 0 ≤ x < width, 0 ≤ y < height. This creates a grid of control points sized (3width-2) x (3height-2). Each Bezier patch is made up of 4 x 4 control points, where the corners are pixels. The patches all share the control points along their connected edges to create C0 continuity.
![]()
To get C2 continuity with bicubics that interpolate every pixel is impossible because images could easily have pixels that break it. But getting C1 continuity is very possible. Just consider a single direction, horizontal, then all we need is the slope at each pixel and that will define every other control point along that horizontal line. Because the control points are evenly spaced, the slope at a pixel P_x,y along the horizontal is given by m = (P_x+1,y - P_x-1,y) / 2. We use this slope to set the control points on either side of the pixel, so C_3x+1,3y = C_3x,3y + m/3 and C_3x-1,3y = C_3x,3y - m/3.
The same can be done for the vertical lines through every pixel.
The inner control points of the patches are still not set. Now it is easier to think of the grid of control points in terms of pixels instead of patches. So for every pixel P_x,y consider the control point C_i,j = C_3x,3y and the 8 points immediately surrounding it (C_i-1,j-1 ; C_i,j-1; ... ; C_i+1,j+1).
The control points at the immediate diagonals to the pixel (C_i-1,j-1 ; C_i+1,j-1 ; C_i+1,j-1 ; C_i+1,j+1) can be set such that C_i-1,j-1 = C_i,j + (C_i,j-1 - C_i,j) + (C_i-1,j - C_i,j) = C_i,j-1 + (C_i-1,j - C_i,j) and similar for the other 3 control points. Do this for every pixel and now the entire grid is set such that every line of control points in either direction is C1.


To render the image, we could simply run the parameters u and v from 0 to (width - 1) and 0 to (height - 1) and evaluate at every (1/scale)th interval to get that pixel on the upsampled image. The problem with this is that the upsampled image looks pulled slightly to the top-left corner.

The reason for this pulled effect is that every pixel is a corner of a patch, and not a center of a patch. Think of the area on the grid representing a single pixel as the control point that interpolates it, and the 8 immediate neighbours. So top top-left control point is already half way into the top-left pixel. To compensate for this, simply add an offset to the u and v parameters. This makes the image stay centered.


These images look quite blurred. So far we have done nothing specific to the fact we are dealing with pixel art. What we have done so far will work well for normal large images, in fact this is quite similar to the results from scaling images in Photoshop.
 Louis C.K. from Faces of
the 2012 TIME 100
Louis C.K. from Faces of
the 2012 TIME 100 |
|
| Photoshop Bicubic | My Result |
 |
 |
 |
 |
For my extra I decided to take advantage of the fact this upscaling method uses control points. This allows a very simple way to manipulate the image in localized areas. Now we can easily do things like remove continuity between two pixels to create hard edges, or create an apparent continuity along the diagonal.
In my implementation, I can click and drag between two diagonal pixels to connect them, or I can right-click an area to apply a “bucket-full” of discontinuity.


With these simple two operations, I can now scale (most) pixel art. Some specific images still cannot be manipulated well.
If any input image is particularly bad, it is pretty easy to simply edit it before scaling it. We can just simplify the detail giving us problems. In fact, even the flagship dolphin example of Depixelizing Pixel Art is a cheat. To disconnect and isolate the left eye, both eyes had to be moved one pixel over to the right. And to complete the border on the back, a black pixel had to be added.


NN / PS / My / Depixalize


While my results are nowhere near as good as Depixelizing Pixel Art, I am still happy with them. I used only B-Splines and feel my construction is much simpler. My result looks better than just a normal bicubic upsampling. There is a small defect on top of staircased pixels, but this is the result of interpolating that pixel. This could be corrected by changing the colour of that pixel, but that would stop my representation from interpolating every pixel so I chose not to do it. A user could cheat and apply such a change to the original image.