Docker
Overview
Installers work fine for simple situations. However, they may not be sufficient when working with complex applications. Installers don’t manage things like:
- Complex configurations e.g., setting up network addresses, keys, security tokens, or other configuration details that are required by the installation.
- Ensuring that the target machine, where the software will be installed, is properly configured.
- Ensuring that the target machine meets the hardware and environmental specification to run properly.
Due to challenges like this,it’s not uncommon for software to be deployed using an installer, but then it doesn’t work properly when the user installs it. This is often due to some of these concerns; something in the user’s environment is intefering or causing issues.
How do we fix this? We control the deployment environment.
Virtualization
Virtualization is a common solution, where you build the environment that you need, and deploy both the software and the environment together. There are different flavors of this.
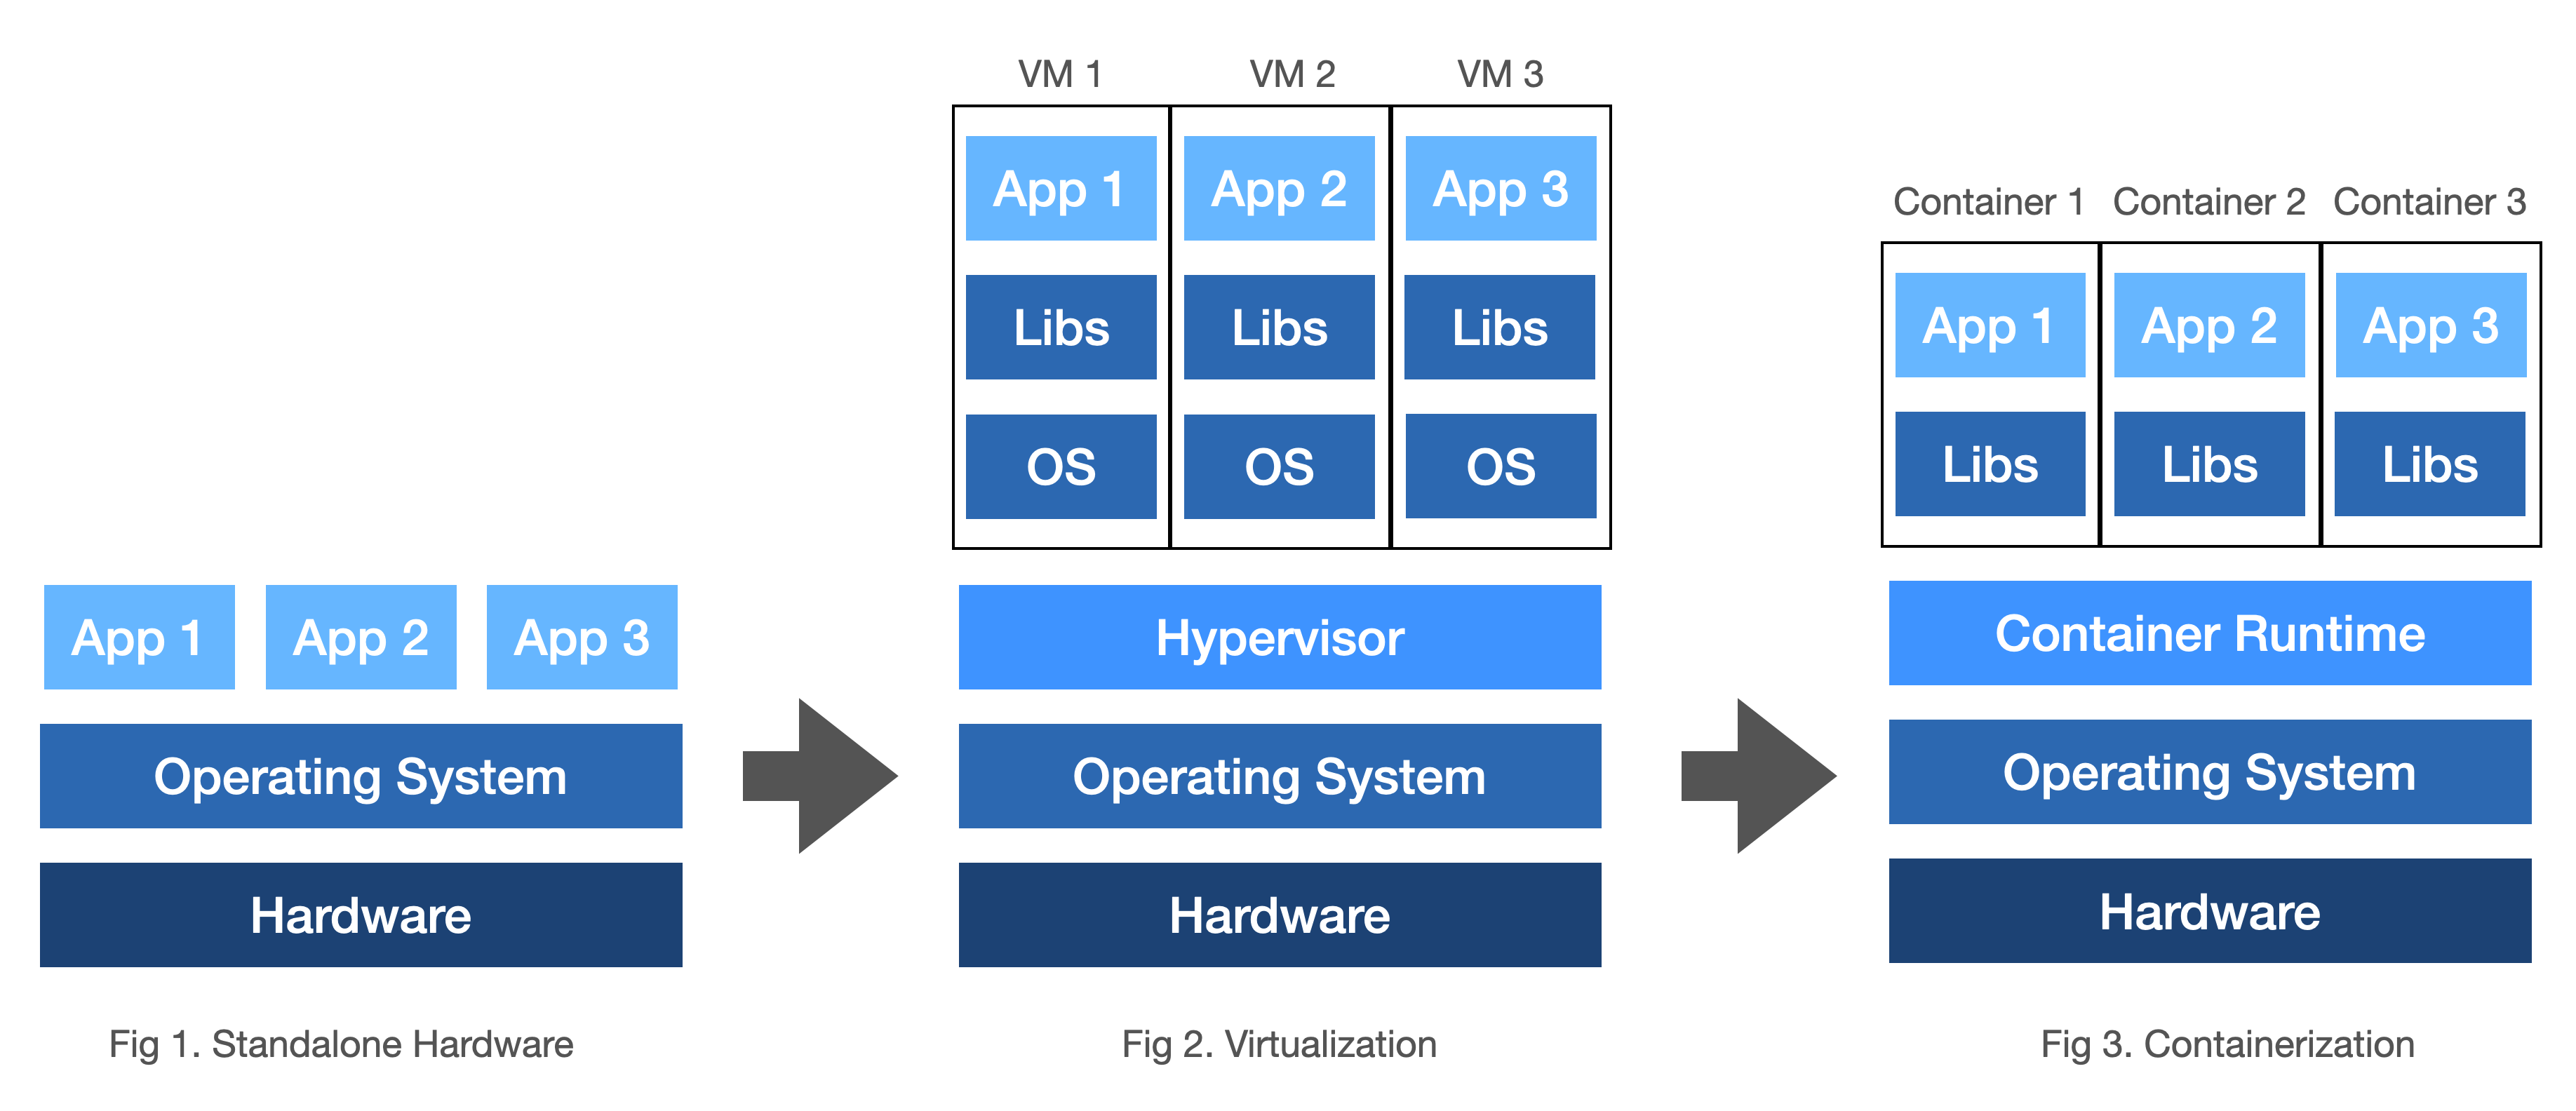
Standalone: For comparison, this represents standard installers. Software runs using the host environment.
- Application share resources, which the OS has to allocate and manage.
- Security concerns with applications installed together.
Virtualization: Multiple virtual machines can be run on the same hardware. Each one is an abstraction of a physical machine, with its own resources and dependencies.
- Each virtual machine is running a complete OS. Can be resource intensive, since each VM is allocated its own memory, CPU cycles etc.
- Provides the ability to adjust how physical resources are shared across VMs (e.g. if we had 128 GB of RAM, we could split it among VMs in any way that made sense).
- Provides isolation of each application into its own OS instance.
Container: an isolated environment for running an application.
- Run applications (not OS) in isolation.
- Containers are processes that use the OS of the host to run an
imagecontaining the application/ - Very lightweight, fast to startup containers compared to a VM.
There are significant advantages to using containers:
- Containers are significantly smaller than virtual machines, and use fewer hardware resources.
- You can deploy containers anywhere, on any physical and virtual machines and even on the cloud.
- Containers are lightweight and easy to start/stop and scale out.
Docker Containers
Docker is a containerization platform. We can use Docker to create a deployment container that contains the complete runtime environment, which can then be run anywhere that has Docker installed.
Installing Docker software provides you with the Containerization Runtime (above), plus the tools to create and deploy your own containers.
Docker helps you eliminate issues of "it works on my computer"... a container represents a fixed, reproducible environment everywhere that you deploy it.
Installation
Download and install directly from the Docker website, or your favorite package manager. Make sure to install the correct version for your system architecture (I’m looking at you, Apple ARM).
Check that it’s installed and available on your path.
$ docker version
Client: Docker Engine - Community
 Version:           25.0.4
 API version:       1.44
 Go version:        go1.22.1
 Git commit:        1a576c50a9
 Built:             Wed Mar  6 16:08:42 2024
 OS/Arch:           darwin/arm64
 Context:           desktop-linux

Server: Docker Desktop 4.28.0 (139021)
 Engine:
  Version:          25.0.3
  API version:      1.44 (minimum version 1.24)
  Go version:       go1.21.6
  Git commit:       f417435
  Built:            Tue Feb  6 21:14:22 2024
  OS/Arch:          linux/arm64
  Experimental:     false
 containerd:
  Version:          1.6.28
  GitCommit:        ae07eda36dd25f8a1b98dfbf587313b99c0190bb
 runc:
  Version:          1.1.12
  GitCommit:        v1.1.12-0-g51d5e94
 docker-init:
  Version:          0.19.0
  GitCommit:        de40ad0
Concepts
To use Docker, you create a Dockerfile – a configuration file that describes the runtime environment.
You can then use Docker to use that Dockerfile to create an image of your application + environment. You can think of an image as a template that you can use to create running instances of your application. You can upload Docker images to a registry so that other people can download and use them (not required, but supported).
DockerHub is Docker’s public registry. It’s simple to use Docker tools to upload your final image there, and for other people to pull and run your application through that image. You can think of DockerHub as GitHub for Docker images.
Finally, you run your image in a container. A container is a running instance of an image. You can run multiple containers from the same image, and each container is isolated from the others.
Workflow
This is the basic workflow to creating a Docker image for your application.
- Create an image, which includes both your application and a Dockerfile.
- Tell Docker to run this image in a container if you wish to run it locally.
- Upload the image to the Docker registry, which allows someone else to download and run it on a different system.
1. Creating an Image
A docker image contains everything that is needed to run an application:
- a cut-down OS
- a runtime environment e.g. jvm
- application files
- third-party libraries
- environment variables
Let’s build a simple application, and then turn it into a Docker image. e.g.
fun main() {
  println("Hello Docker!")
}
$ kotlinc Hello.kt -include-runtime -d Hello.jar
$ java -jar Hello.jar
Hello Docker!
To bundle this application, create a Dockerfile i.e. a configuration file for your image that describes how to execute it.
# Dockerfile
# start with this image, which includes a Linux kernel running Java JDK 17
FROM openjdk:17

# import your Hello.jar file, and host in the app subdir.
COPY Hello.jar /app

# set /app as your working directory
WORKDIR /app

# run the application
CMD java -jar Hello.jar
You can find suitable Docker images on https://hub.docker.com. In this case, we’re using Tamurin JDK as our base image (Linux/Java installation).
2. Package your application
To create the image:
$ docker build -t hello-docker .
To see the image that we’ve created:
$ docker images
REPOSITORY     TAG       IMAGE ID       CREATED         SIZE
hello-docker   latest    a615e715b56d   7 seconds ago   455MB
To run our image:
$ docker run hello-docker
Hello Docker!
Keep in mind that you are publishing your directory contents, and then running the jar file that you packaged. Docker doesn’t recompile or rebuild anything! If you make changes to your source code, remember to recompile and rebuild the jar file, otherwise those changes won’t show up in your image.
3. Publish your image
To make this image available to other systems, you can publish it to the Docker Hub, and make it available to download. See Docker repos documentation for more details.
- Create an account on Docker Hub if you haven’t already. Login.
- Create a repository to hold your images.
- Tag your local image with your username/repository.
- Push your local image to that repository.
$ docker image ls
REPOSITORY     TAG       IMAGE ID       CREATED         SIZE
hello-docker   latest    f81c65fd07d3   3 minutes ago   455MB

$ docker tag f81c65fd07d3 jfavery/cs346

$ docker push jfavery/cs346:latest
The push refers to repository [docker.io/jfavery/cs346]
5f70bf18a086: Pushed
8768f51fa877: Pushed
5667ad7a3f9d: Pushed
6ea5779e9620: Pushed
fb4f3c9f2631: Pushed
12dae9600498: Pushed
latest: digest: sha256:6ddd868abde318f67fa50e372a47d4a04147d29722c4cd2a59c45b97a413ea22 size: 1578
4. Pull your image to a new machine
To pull (download) this image to a new machine, use docker pull.
$ docker pull jfavery/cs346
Using default tag: latest
latest: Pulling from jfavery/cs346
0509fae36eb0: Pull complete
6a8d9c230ad7: Pull complete
0dffb0eed171: Pull complete
77de63931da8: Pull complete
dc36babb139f: Pull complete
4f4fb700ef54: Pull complete
Digest: sha256:6ddd868abde318f67fa50e372a47d4a04147d29722c4cd2a59c45b97a413ea22
Status: Downloaded newer image for jfavery/cs346:latest
docker.io/jfavery/cs346:latest

$ docker run hello-docker

$ docker images
REPOSITORY      TAG       IMAGE ID       CREATED          SIZE
jfavery/cs346   latest    f81c65fd07d3   10 minutes ago   455MB

$ docker run jfavery/cs346
Hello Docker!
To run a long-running program (that doesn’t halt after execution), use the -d flag.
$ docker run -d jfavery/cs346
Configuration
Persisting data
So what is happening is that when we launch a container, it creates a new environment from the image and sets up the container with its own mutable environment and data. This works great, until you stop the container - when you restart it, the environment is recreated, and you lose any previous data!
How do we avoid this? We can create a volume on the host OS, outside the scope of the container, and then provide the container access to the volume. For example, we can create a data file that will persist after container restarts.
# create a volume on the host
# we attach it at runtime below
$ docker volume create data-storage

# data-storage is the volume we created
# /data is a container directory that maps to the volume
$ docker run -v data-storage:/data jfavery/cs346
Managing web services
One common use case for container is as a way to deploy server applications, including web services. These have unique requirements compared to standard applications – namely the need to manage network requests that originate from outside the container. Docker can handle this, with some additional configuration.
The following example is a Spring Boot application from the public repo. The application listens on port 8080, and manages get and post requests for messages:
class Message(id: String, text: String)
postwill store a message that is sent in the post body.getwill return and display a list of the messages that have been stored.
Here’s an example of a Dockerfile for this web service:
# Dockerfile
FROM openjdk:17
VOLUME /tmp
EXPOSE 8080
ARG JAR_FILE=target/spring-boot-docker.jar
ADD ${JAR_FILE} app.jar
ENTRYPOINT ["java","-jar","/app.jar"]
- FROM: the starting image (Linux + JVM)
- VOLUME: mapping an external volume
- EXPOSE: port that our application we will listen on
- ARG: passing in JAR_FILE arguments pointing to our application’s JAR file
- ADD: remap our JAR file to a local/internal JAR file that will be executed
- ENTRYPOINT: how to run the JAR file
To build the Docker image:
$ docker build -t docker-spring-boot .

[+] Building 1.9s (8/8) FINISHED
 => [internal] load build definition from Dockerfile
 => => transferring dockerfile: 69B
 => [internal] load .dockerignore
 => => transferring context: 2B
 => [internal] load metadata for docker.io/library/openjdk:17
 => [auth] library/openjdk:pull token for registry-1.docker.io
 => [internal] load build context
 => => transferring context: 57.63MB
 => CACHED [1/2] FROM docker.io/library/openjdk:18@sha256:9b448de897d211c9e0ec635a485650aed6e28d4eca1efbc34940560a480b3f1f
 => [2/2] ADD build/libs/docker-spring-server-1.0.jar app.jar
 => exporting to image
 => => exporting layers
 => => writing image sha256:2593c79e75b19b36dd2b0ee16fca23753578fb6381fb6d14f5c5e44fc0162bb4
 => => naming to docker.io/library/docker-sprint-boot
When we run the container, we need to specify that we want to map port 8080 from the outside environment into the container. We can do this using the -p command-line option:
$ docker run -p 8080:8080 docker-spring-boot
  .   ____          _            __ _ _
 /\\ / ___'_ __ _ _(_)_ __  __ _ \ \ \ \
( ( )\___ | '_ | '_| | '_ \/ _` | \ \ \ \
 \\/  ___)| |_)| | | | | || (_| |  ) ) ) )
  '  |____| .__|_| |_|_| |_\__, | / / / /
 =========|_|==============|___/=/_/_/_/
 :: Spring Boot ::                (v2.7.4)

2023-03-26 16:31:11.453  INFO 1 --- [           main] com.example.demo.DemoApplicationKt       : Starting DemoApplicationKt using Java 17.0.2 on d2a3849df55b with PID 1 (/app.jar started by root in /)
2023-03-26 16:31:11.455  INFO 1 --- [           main] com.example.demo.DemoApplicationKt       : No active profile set, falling back to 1 default profile: "default"
...
...
...
Our web service is now running in a container! We can now access the web service as-if it was running locally on port 8080.