
JavaFX
JavaFX was originally designed by Sun Microsystems in 2008 as a replacement for the Java AWT and Swing toolkits, and was designed to compete directly with Adobe Flash/Flex and similar web toolkits. In 2010, Oracle released JavaFX into the community as part of the OpenJDK initiative. The open source version of JavaFX is currently maintained by Gluon and the community.
JavaFX is a lightweight toolkit that runs well on Windows, Mac, Linux. It provides a native look-and-feel on each platform, and even supports hardware acceleration! It’s not included with the JRE, but because it’s open source, we can distrbute the libraries with our applications.
Example: HelloFX
The following application shows how to create a simple window with some graphics. Athough longer than our console version of “Hello Kotlin”, it accomplishes quite a lot with minimal code. We’ll discuss this in further detail below.
import javafx.application.Application
import javafx.scene.Scene
import javafx.scene.control.Label
import javafx.scene.layout.StackPane
import javafx.scene.text.Font
import javafx.stage.Stage

class HelloFX : Application() {
    // main entry point for an JavaFX application
    // this is the only base method that needs to be implemented
    override fun start(stage: Stage) {
        // create a text label and add it to a StackPane to centre it
        // setup a Scene aka scene-graph to display the contents
        val label = Label("Hello JavaFX")
        label.font = Font("Helvetica", 14.0)
        val scene = Scene(StackPane(label), 320.0, 240.0)

        // setup and show the stage (window)
        stage.title = "HelloFX"
        stage.scene = scene
        stage.show()
    }
}
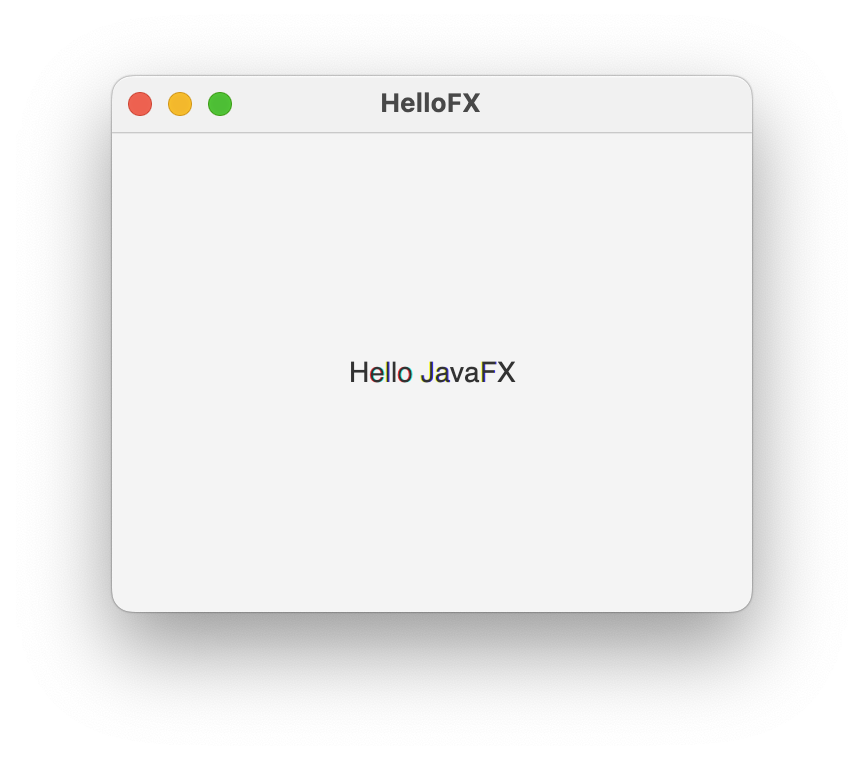
This is actually pretty impressive when you realize that we have just created:
- A resizable window with min/max/restore buttons
- A titlebar and content centred in the window.
- A UI that will inherit the appearance of any platform where it runs. Execute this on Windows, and the buttons will have a standard appearance and positioning for that platform!
In JavaFX, our highest level abstractions are the Application class, with one or more Stage classes representing the application windows, and one or more Scene classes to manage the contents of a window. Nodes represent the individual graphical elements.
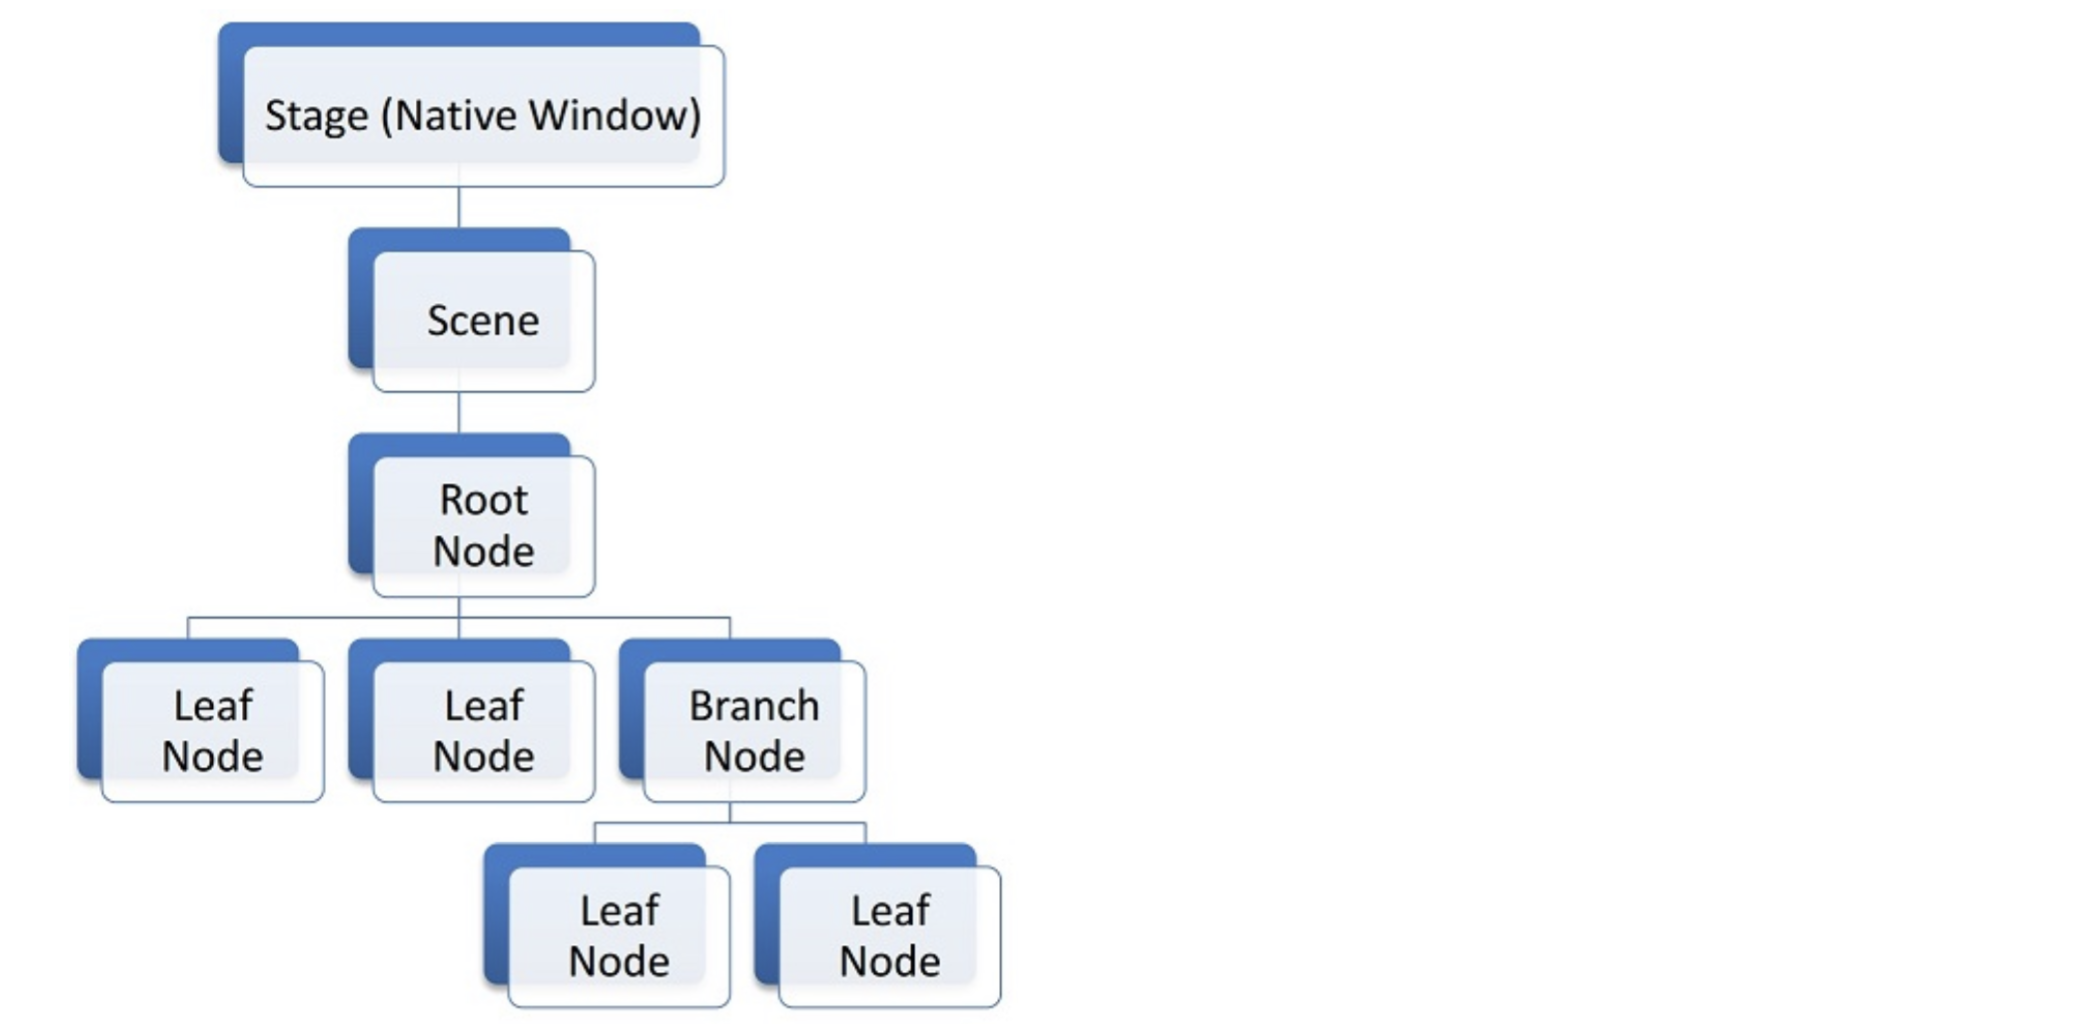
As we saw in the previous chapter with JavaFX, it’s standard practice in 2D graphical applications to represent the interface as a scene graph of objects. In JavaFX, the Scene class maintains this scene graph, consisting of various nodes, for each Scene that we display. Note that it’s possible to have multiple windows, each with multiple scenes, each of which manages a different scene graph. (Multiple windows can be displayed at once, but only once scene graph can be displayed at a given time in a window, representing the current window contents).
The Application class is top-level representation of the application. It serves as the application entry point, replacing the main() method. During launch, a JavaFX application will perform the followin steps:
- Constructs an instance of the specified Application class
- Calls the
init()method - Calls the
start(javafx.stage.Stage)method (passing in a default stage) - Waits for the application to finish, which happens when either of the following occur:
- the application calls
Platform.exit() - the last window has been closed and the
implicitExitattribute onPlatformis true
- the application calls
- Calls the
stop()method
The start() method is abstract and MUST be overridden. The init() and stop() methods are optional, but MAY be overridden. It’s fairly normal to just override start() and ignore the others most of the time.
The Stage class is the top-level container or application window. You can have multiple stages, representing multiple windows.
 javafx.stage.Window
    javafx.stage.Stage
A Stage instance is automatically created by the runtime, and passed into the start() method.
Stage methods operate at the window level:
setMinWidth(),setMaxWidth()setResizable()setTitle()setScene()show()
The Scene is a container for the content in a scene-graph. Although you can create multiple scenes, only one can be attached to a window at a time, representing the “current” contents of that window.
javafx.scene.Scene
To construct a scene, and set it up:
- Create a scene graph consisting of a container holding on or more nodes;
- Add the root node of the scene graph to the scene;
- Add the scene to a stage and make the stage visible.
Scene methods manipulate the scene graph, or attempt to set properties for the entire graph:
setRoot(Node)setFill(Paint)getX(),getY()
Node is the base class for all elements of a scene graph. Types of nodes include:
- a drawing Canvas and drawable shapes like Circle, Rectangle, and Line.
- standard widgets like Button, MenuBar, Spinner, Label and TextField.
- media playback widgets like ImageView and MediaView.
- animations like SequentialTransition and FadeTransition.
- meta objects like Camera and LightBase to offer fine control of the scene.
Nodes have common properties for position (x, y), width and height, background colour and so on. These can be set manually in code, or in the case of visual properties, associated with a CSS stylesheet.
Layout is how items are arranged on the screen. Layout classes are branch nodes that have built-in layout behaviour. Your choice of parent class to hold the nodes determines how its children will be laid out.
| Layout Class | Behaviour |
|---|---|
| HBox | Layout children horizontally in-order |
| VBox | Layout children vertically in-order |
| FlowPane | Layout left-right, top-bottom in-order |
| BorderPane | Layout across sides, centre in-order |
| GridPane | 2D grid, with cells the same size |
Example: Java Version
Here’s the Java Version example from above, annotated. The sequence to setup a window is:
- Define the nodes (lines 4-11)
- Create a layout as the root of the scene graph (line 14), which will hold the nodes.
- Add the root node to the scene (line 18)
- Add the scene to the stage (line 19)
- Show the stage (line 23)
class App: Application() {
  override fun start(stage:Stage?) {
    // imageView is our first node
    val image = Image("java.png", 175.0, 175.0)
    val imageView = ImageView(image)

    // label is our second node
    val label = Label(
      System.getProperty("java.vendor")
      + System.getProperty("java.version") + "\n"
        + System.getProperty("javafx.version"))

    // box is our layout that will manage the position of our nodes
    val box = VBox(imageView, label)
    VBox.setMargin(label, Insets(10.0))

    // create a scene from the layout class, and attach to the stage
    val scene = Scene(box, 175.0, 225.0)
    stage.setScene(scene)

	  // set window properties and show it
    stage.setResizable(false)
    stage.show()
  }
}
JavaFX expands on the Listener model that was introduce in Java Swing, and provides support for a wide varieties of events. The Event class is the base class for a JavaFX event. Common events include:
- MouseEvent − This is an input event that occurs when a mouse is clicked. It includes actions like mouse clicked, mouse pressed, mouse released, mouse moved.
- KeyEvent − This is an input event that indicates the key stroke occurred over a node. This event includes actions like key pressed, key released and key typed.
- WindowEvent − This is an event related to window showing/hiding actions. It includes actions like window hiding, window shown.
These events are generated automatically by the appropriate source (e.g. pressing a key when the cursor is in a TextField widget will generate a KeyPress event).
Event Handling is the mechanism that controls the event and decides what should happen, if an event occurs. JavaFX provides handlers and filters to handle events. In JavaFX every event has:
- Target − The node on which an event occurred. A target can be a window, scene, or a node.
- Source − The source from which the event is generated. In the above scenario, mouse is the source of the event.
- Type − Type of the occurred event.
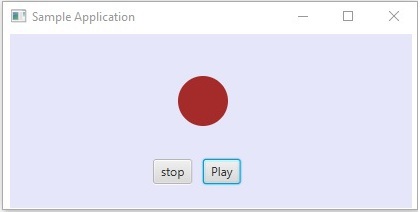
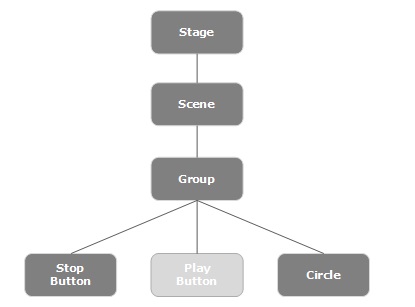
Assume that we have an application which has a Circle, Stop and Play Buttons1. If you click on the play button, the source will be the mouse, the target node will be the play button and the type of the event generated is the mouse click.
Whenever an event is generated, JavaFX walks through the following phases.
The default/initial route of the event is determined by construction of an Event Dispatch chain. It is the path from the stage to the source Node. In the example above, the dispatch chain would be from Stage -> Scene -> Grop -> Play Button.
After the construction of the event dispatch chain, the root node of the application dispatches the event. This event travels to all nodes in the dispatch chain (from top to bottom). If any of these nodes has a filter registered for the generated event, it will be executed. If none of the nodes in the dispatch chain has a filter for the event generated, then it is passed to the target node and finally the target node processes the event.
In the event bubbling phase, the event is travelled from the target node to the stage node (bottom to top). If any of the nodes in the event dispatch chain has a handler registered for the generated event, it will be executed. If none of these nodes have handlers to handle the event, then the event reaches the root node and finally the process will be completed.
Event filters and handlers are classes which can process an event. A node can register to more than one handler/filter (e.g. for handling events from different targets). Handlers or filters setup on a parent node can be created to process events for their children.
To add or remove filters or handlers, you need to use the appropirate method on a node.
Example: Mouse Event Filter
// Creating the mouse event handler
EventHandler<MouseEvent> eventHandler = new EventHandler<MouseEvent>() {
   @Override
   public void handle(MouseEvent e) {
      System.out.println("Hello World");
      circle.setFill(Color.DARKSLATEBLUE);
   }
};
// Adding event Filter
Circle.addEventFilter(MouseEvent.MOUSE_CLICKED, eventHandler);

// Remove like this
// circle.removeEventFilter(MouseEvent.MOUSE_CLICKED, eventHandler);
Example: Mouse Event Handler
// Creating the mouse event handler
EventHandler<javafx.scene.input.MouseEvent> eventHandler =
   new EventHandler<javafx.scene.input.MouseEvent>() {

   @Override
   public void handle(javafx.scene.input.MouseEvent e) {
      System.out.println("Hello World");
      circle.setFill(Color.DARKSLATEBLUE);
   }
};
// Adding the event handler
circle.addEventHandler(javafx.scene.input.MouseEvent.MOUSE_CLICKED, eventHandler);

// Remove like this
// circle.removeEventHandler(MouseEvent.MOUSE_CLICKED, eventHandler);
Nodes also have convenience methods for adding handlers directly, without defining them ahead of time. It’s common practice to combine these with lambdas for much more concise event handling code.
For example, the Circle class in the example above has the following convenience methods, which accept specific types of handlers:
setOnMouseClicked()setOnMousePressed()setOnMouseReleased()setOnMouseMoved()setOnKeyPressed()setOnKeyReleased()
Using these methods, we can replace the Event Handler code above with convenience methods and a lambda:
// Convenience method to add mouse event handler as a lambda
circle.setOnMouseClicked(event -> {
   System.out.println("Hello World");
   circle.setFill(Color.DARKSLATEBLUE);
});
This is considered “standard practice”.
How-to questions for building desktop applications with Kotlin and JavaFX.
See the JavaFX lectures, and the public samples under 03.JavaFX
To create a JavaFX application, you need to derive your top-level class from Application, and override the start method. The stage that is passed into this method by the framework is an abstraction of the window itself.
import javafx.application.Application
import javafx.stage.Stage

class Main : Application() {
	override fun start(stage: Stage) {
  	// set window parameters
    stage.title = "Window title"
    // display it
    stage.show()
  }
}
Set the stage properties related to window sizing.
stage.isResizable = true

// provide range for width
stage.width = 800.0
stage.width = 800.0
stage.minWidth = 400.0
stage.maxWidth = 1200.0

// provide range for height
stage.height = 400.0
stage.minHeight = 200.0
stage.maxHeight = 800.0
See the Widget lectures and the public samples under 06.Widgets.
Determine which widgets you need on the screen, and then create a layout, which describes how you want them positioned (see JavaFX - Layout).
// use a VBox to stack 2 buttons vertically
val vbox = VBox()
val button1 = Button("One")
val button2 = Button("Two")
vbox.children.addAll(button1, button2)

// add layout to a scene
val scene = Scene(vbox)

// add scene to the stage
stage.scene = scene
stage.show()
See the Widget lectures and the public samples under 06.Widgets.
You need three classes: MenuBar, Menu and MenuItem. e.g. a typical menu would include File (Menu), with drop-down menus for New, Open, and so on (MenuItems).
Here’s an example of setting up a File menu with a Quit menu item that exits the application.
val menuBar = MenuBar()
val fileMenu = Menu("File")
val fileQuit = MenuItem("Quit")

// activating Quit menu exits the application
fileQuit.setOnAction { Platform.exit() }

// Ctrl-Q will also activate the Quit menu item
fileQuit.accelerator = KeyCodeCombination(KeyCode.Q, KeyCombination.CTRL_DOWN)

// assemble together; the menu still needs to be added to a layout
menuBar.menus.add(fileMenu)
fileMenu.items.add(fileQuit)
See the Events lectures and the public samples under 05.Events.
See JavaFX - Event Handlers. You need to add a handler to a widget, telling it what code to execute when the user activates that widget.
// mouse events
val delButton = Button("Delete")
delButton.setOnMouseClicked { event -> deleteSelectedFile() }

// keyboard events
val input = TextField()
input.setOnKeyPressed { event ->
	when (event.code) {
   	KeyCode.ENTER -> processInput()
  }
}
You have a couple of choices:
- You can create a new Stage containing a custom layout that you create, and show it to collect data. For something complex (e.g. preferences dialog) this may be required.
- For very simple input, JavaFX has dialog box classes.
Here’s an example of how to collect a single text value in a dialog.
val td = TextInputDialog()
td.title = "Title"
td.headerText = "Enter new value:"
td.showAndWait()
// the app will block here until the user enters a value
val value:String = td.editor.text
You need to place an appropriately-sized image in the src/resources/ folder of your project, and then you can reference them directly in code.
This works best with PNG files, sized to roughly 20x20.
val renameButton = Button("Rename")
renameButton.graphic = ImageView(Image("rename.png"))
This is useful if you want audio feedback from the interaction e.g. button “clicks”.
Here’s a click handler for a button that plays a sound when the button is pressed. The file click.mp3 should be placed in the src/resources folder.
val button = Button("Click Here")
button.setOnMouseClicked {
  val sound = javaClass.classLoader.getResource("click.mp3").toString()
  val clip = AudioClip(sound)
  clip.play()
}
-
Example taken from https://www.tutorialspoint.com/javafx/javafx_event_handling.htm, which has a full walkthrough. ↩︎