
A1 File Explorer
Build an application for browsing files on your local file system and displaying their contents.
When launched, your program should display a sorted list of files and directories on the left, and a contents pane on the right. The user is able to use the keyboard to navigate through the file system, and the contents pane will update to reflect the contents of the currently selected file for supported file types (see below).
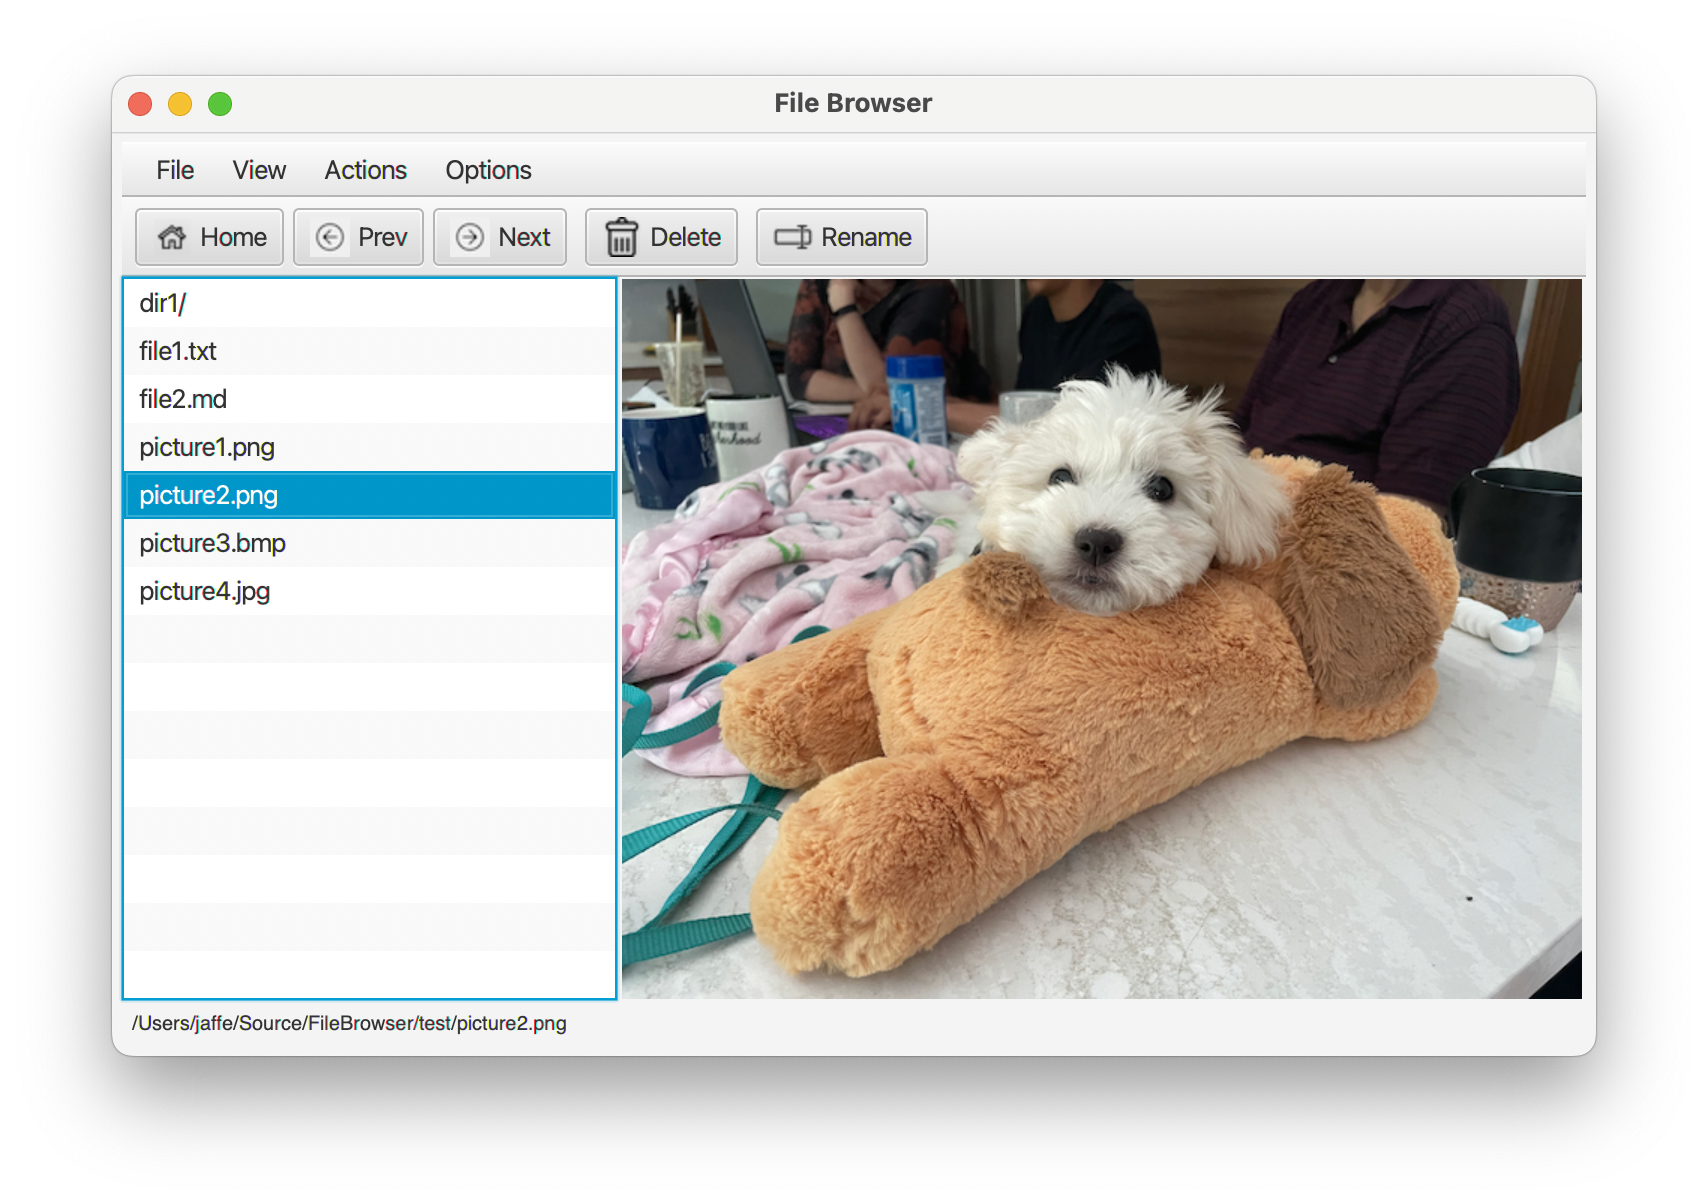
Your program should resemble this layout, but you may make changes to the layout as long as you meet the requirements below. You will be graded on usability and ease-of-use, so try and improve on this design!
The following are core requirements:
-
The left-hand side will display a list of files and directories.
- When launched, this list should show the contents of a
testfolder that is included in your project (referred to asHomebelow). This list should be sorted alphabetically.
- When launched, this list should show the contents of a
-
The user can use navigate through this list using the keyboard, toolbar buttons, or menu options.
- User should be able to scroll up and down the list of files using arrow keys to change the selected file, or pick an entry in the list by clicking on it with a pointing device. The status line should always display the path and filename of the selected item.
- Users should be able to descend into a directory, using a hotkey (
Enter), or a toolbar button (Next), or a menu item, or by double-clicking with a pointing device. - Users should be able to navigate up to the parent directory using a hotkey (
BackspaceorDelete), or a toolbar button (Prev), or a menu item. - Users should be able to return to the
Homedirectory at any time by pressing a button on the toolbar or selecting a corresponding menu item.
-
User can perform file-manipulation operations:
- Users should be able to rename a file or directory, by selecting the item, and then pressing a
renameicon on the toolbar, or selectingAction - Renamefrom the menu bar. You should prompt the user for the new name. If they provide an invalid name, you should display an error and cancel the rename operation [tip: if you rename a file, your list of files should remain sorted!] - Users should be able to move a file or directory to a different location, by selecting an item, and then pressing a
moveicon on the toolbar, or selectingAction - Movefrom the menu bar. You should prompt the user for the destination directory with a File Chooser dialog box, and display an error if the destination is invalid. - Users should be able to delete a file or directory, by selecting the item, and then pressing a
deleteicon on the toolbar, or selectingAction - Deletefrom the menu bar. You must prompt the user with a confirmation dialog before proceeding (i.e. ask them if they wish to delete the item, and give them a chance to cancel this operation).
- Users should be able to rename a file or directory, by selecting the item, and then pressing a
-
The right-hand side will display the content of the selected file. You can use the file extension to determine the type of file (and you can assume that the file extension is accurate and matches the file type).
- If a directory is selected, you should show a blank page for the content pane.
- If the selected file is an image (i.e. a file with an extension of
png,jpg,bmp) then you should display the image sized to fit the contents pane. - If the selected file is text (i.e. a file with an extension of
txtormd) then you should display the contents of the file. The contents pane should have a scrollbar if the file requires more than a single screen to display. - If the file is any other type, or an unknown type, display the text “Unsupported type” in the contents pane.
- If the file is unreadable for any reason (e.g. insufficient permissions), you should show display the text “File cannot be read” in the contents pane.
-
The status line should show details about the selected file, including the full path and filename.
Hint: Kotlin has a number of built-in classes that can help! Consider using the java.io.File class to represent a file on the file system.
To minimize the risk of accidentally modifying an important file or directory on your computer, we want you to test in a sandbox: a self-contained directory that is just used for testing.
- Setup your test directory
Unzip this file and copy the contents into a folder named test at the top level of your project. Your project should look something like this:
.
├── build
├── build.gradle
├── gradle
├── gradle.properties
├── gradlew
├── gradlew.bat
├── settings.gradle
├── src
│  └── main
└── test
   ├── dir1
   │  ├── dir2
   │  │  └── file4.txt
   │  └── file3.txt
   ├── file1.txt
   ├── file2.md
   ├── picture1.png
   ├── picture2.jpg
   └── picture3.bmp
- Use this
testfolder as the starting folder when your application launches. It should also be the folder that you return to when the user chooses to returnHome.
To make sure that your program selects the correct folder, specify it this way in your code:
// determine starting directory
// this will be the "test" subfolder in your project directory
val dir = File("${System.getProperty("user.dir")}/test/")
- Your code must be written in Kotlin 1.8 or later, using Open JDK 17 and JavaFX 18. Your project should be a Gradle project, and buildable using
gradle buildor by using Gradle commands in IntelliJ. - You are not required to use IntelliJ, but if you do so, you should use IntelliJ 2023.1.1 or later with the appropriate plugins.
- You may use any classes included in OpenJDK or JavaFX or any samples provided in the public repo. You cannot use any other source code without permission from the instructor.
Your submission should include:
-
All files required to build your project.
-
A
readme.mdfile that includes, at a minimum, your name, student number, and the operating system where you tested. If the TA needs to know anything else to run your assignment (e.g. undocumented hotkeys), include them in this file. For example:Jeff Avery 12345678 javery kotlinc-jvm 1.8.20 (jre 18.0.2) macOS Ventura 13.3.1
You should submit your project in your GitLab repository for this course (and push to the server) by the deadline.
- Make sure your project is in the
a1folder in your repo.
Your submission will be assessed roughly as follows:
- 5%: Complete submission including project file and
readme. Code compiles and runs with Gradle. Test folder included correctly. - 20%: File list reflects contents correctly. User can navigate through the list as described, and has a means of navigating to the root.
- 5%: Status bar displays selected file.
- 10%: Menu, Toolbar, Hotkeys all work as expected. -5% for each item missing.
- 15%: Can display file contents for text and markdown files; scrollbar appears when required.
- 15%: Can properly display image contents, scaled to fit the window.
- 10%: Can rename items as described. User is prompted.
- 10%: Can move files as described. User is prompted.
- 10%: Can delete files as described. User is prompted.
- May 12, 2023. Initial commit.
- May 25, 2023. Clarified that list of files should be sorted.