
Android
Smartphones and tablets are considered to be mobile devices, running mobile applications on an OS tailored to that device’s specific capabilities.
- Mobile applications are designed to run on portable devices like smartphones or tablets, and scaled to the size and characteristics of that device. The term “mobile device” is often used as a placeholder for “smartphone and tablet multi-touch based systems”1.
- Mobile applications use multi-touch as a primary input mechanism. These applications might support keyboard input, but it’s secondary to touch.
- Although not required, mobile applications often have feature parity with their desktop counterparts e.g. MS Word on iPad is very close to a full-feature version of that application.
Mobile devices often have similar graphical and processing capabilities and low-end notebook or desktop computers; the limits on these devices are often related to the challenge of interacting with a rich UI on a small screen. For our purposes, we can think of them as specialized devices hosting graphical, touch-enabled applications.
Mobile applications share many characteristics with desktop applications:
- Every application is distinct, and responsible for it’s own data.
- Applications do not routinely communicate with one another.
- Applications tend to be graphical. There are ways to enter and manipulate text using a standard keyboard, and you can point-and-click on the screen to interact.
However, there are also some distinct differences that you need to consider:
- The screen tends to be much smaller than a notebook or desktop screen 2. Widgets and items on the screen need to be scaled larger so that they are readable, and so that targets aren’t too small to manipulate.
- Given the screen size issues, menus are a bad idea. Widgets should be considerably larger than they would be on desktop to support touch interaction.
- Keyboard support is limited. Mobile devices tend to rely on “soft” on-screen keyboards. On-screen keyboards lack tactile feedback, are slower and less accurate than physical keyboards.
- Point-and-click interaction is generally replaced by multi-touch interaction. You can generally treat a touch on the screen as equivilant to clicking with a mouse, but multi-touch does support other richer forms of interaction (e.g. swipes, pinch/zoom).
- The configuration of a mobile device can change dynamically e.g. rotating the device from vertical to horizontal generally causes the screen to “rotate” to match the new configuration.
Although there will be some variation across plaforms, mobile applications share a number of common features.
-
Applications are optimized to be run full-screen.
-
Applications are optimized for multi-touch interaction, where your finger is used to interact with on-screen elements. You should expect most interaction to consist of multi-touch gestures or on-screen actions that you perform. The following are common3:
- Press: select the target under the point of contact and activate it (i.e. analogous to single-click with a mouse)
- Long-press: equivilent to right-clicking on an element.
- Swipe: move or translate content.
- Tap-swipe: move a chunk e.g. page up or page down.
- Pinch/zoom: change the scale of the content.
-
For text entry and manipulation, you should support a soft keyboard (i.e. on-screen). Do not assume that the user has a physical keyboard connected. When possible show a keyboard optimized for region and data that you’re collecting e.g. a numeric keyboard for entering phone numbers.
-
Do not assume mouse or stylus, except under very specific circumstances where you know they will exist. e.g. building a drawing application optimized for a stylus.
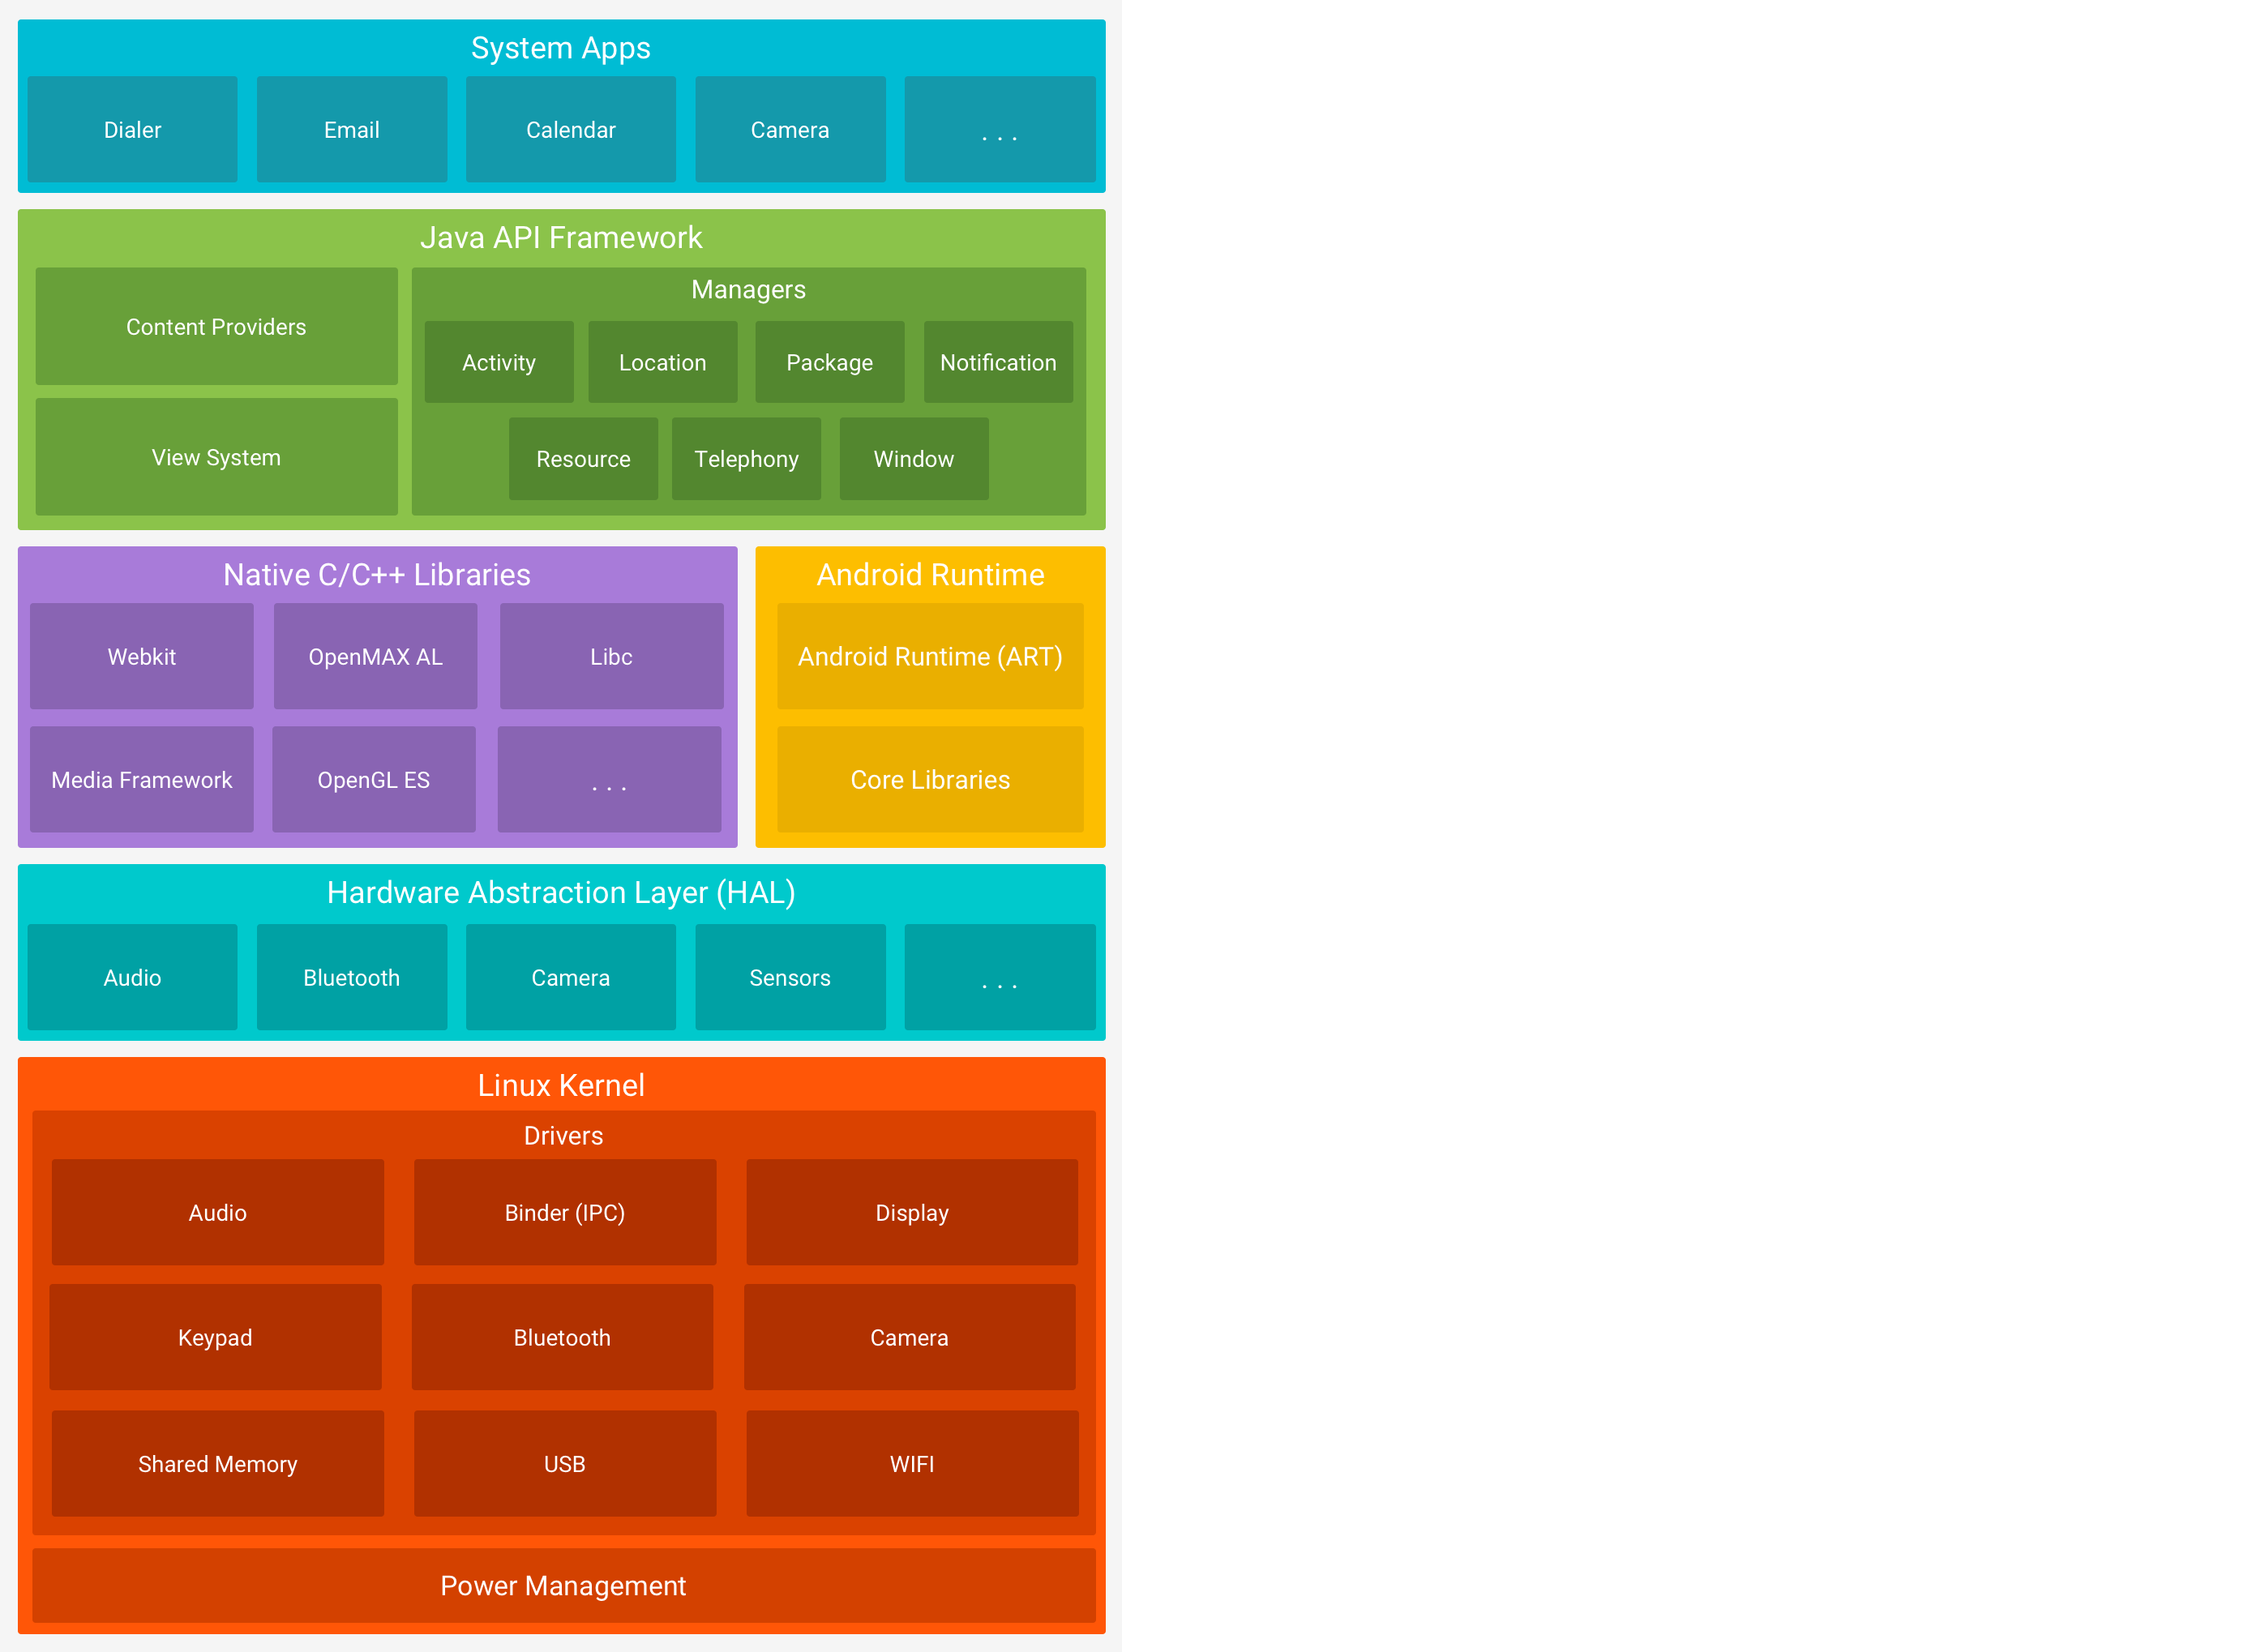
Android is an open-source, Linux based operating system designed to run across a variety of devices and form-factors. It’s an example of a layered architecture, which increasing levels of abstraction as we move from the low-level hardware to higher-level application APIs. Mid-level components exist to provide services to components futher up the stack.
https://developer.android.com/guide/platform
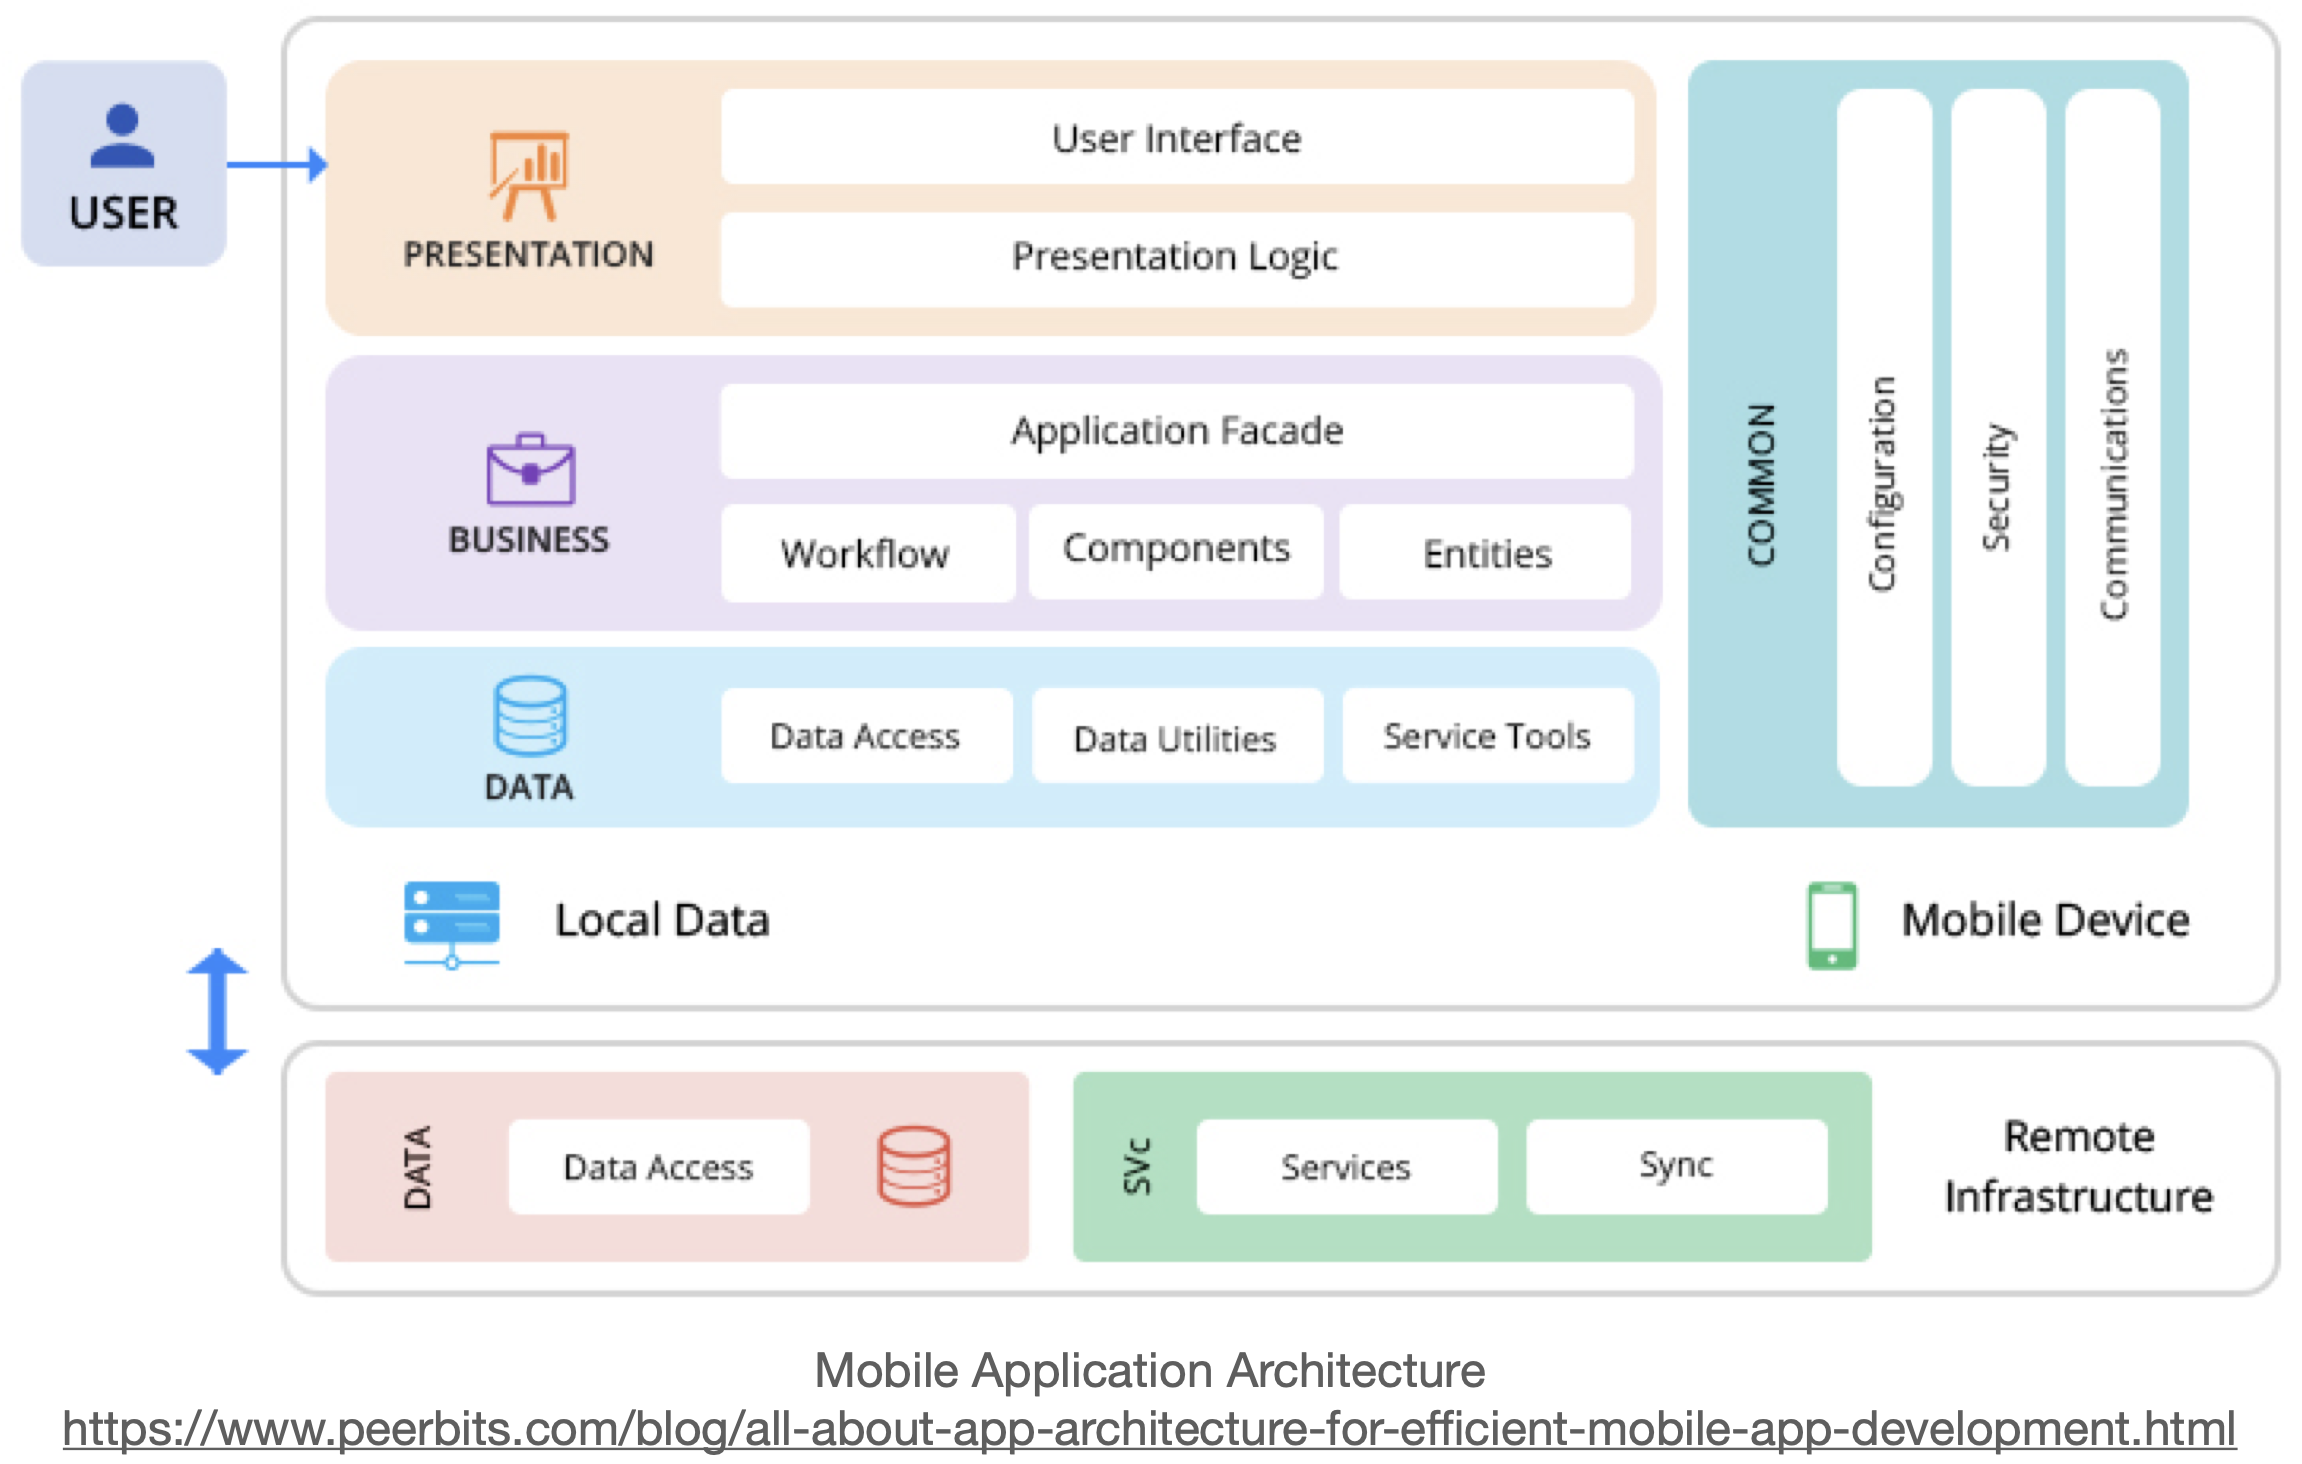
Mobile devices are an interesting example of a distributed architecture, where they are expected to pull data and leverage capabilities made available by remote services. A modern mobile architecture is usually described as multiple logical layers.
The Android SDK and all relevant documentation is available on the Android Developer Site. Android devlopment requires an IDE, but you have choices on what you can use:
- IntelliJ IDEA has full support for Android. You can use IntelliJ IDEA Community Edition, which includes an Android plugin by default. This is a general IDE that can do more than just Android development.
- Android Studio is a fork of IntelliJ IDEA supported Google. It can also be downloaded from the Android Developer Site](https://developer.android.com) and it’s optimized for Android development.
My personal preference is to run IntelliJ IDEA Community. Kotlin language updates tend to appear there ahead of Android Studio, and it supports desktop and command-line applications as well. Either will work for this course.
As a developer, the entire feature-set of the Android OS is available to you through APIs written in Java and/or Kotlin4. These APIs form the building blocks you need to create Android apps by providing critical services: :
- A rich and extensible View System you can use to build an app’s UI, including lists, grids, text boxes, buttons, and even an embeddable web browser
- A Resource Manager, providing access to non-code resources such as localized strings, graphics, and layout files
- A Notification Manager that enables all apps to display custom alerts in the status bar
- An Activity Manager that manages the lifecycle of apps and provides a common navigation back stack
- Content Providers that enable apps to access data from other apps, such as the Contacts app, or to share their own data
Android also includes a set of core runtime libraries that provide most of the functionality of the Java programming language, including some Java 8 language features, that the Java API framework uses.
For devices running Android version 5.0 (API level 21) or higher, each app runs in its own process and with its own instance of the Android Runtime (ART). ART is written to run multiple virtual machines on low-memory devices by executing DEX files. ART provides Ahead-of-time (AOT) and just-in-time (JIT) compilation, and Optimized garbage collection (GC) to the platform5.
There are four different types of core components that can be created in Android. Each represents a different style of application, with a different entry point and lifecycle.
These four component types exist in Android:
- An Activity is an Android class that represent a single screen. It handles drawing the user interface (UI) and managing input events. An application may include multiple activities, where one is the “entry point”.
- A Service is a general-purpose background service, representing some long-running operation that the OS should perform, which does not require a user-interface. e.g. a music playback service.
- Broadcast Receivers: A service that can launch itself in response to a system event, without the need to stay running in the background like a regular service. e.g. an application to pop up a reminder when the user arrives at a destination.
- Content Providers managed shared information that other services or applications can access. e.g. a shared contact database.
Activities are the most common type of component, since they include user interfaces and visible components.
Typically one activity will be the “main” activity that represents the entry point when your application launches.
There are a standard set of steps that occur when your Android application launches. The system uses the information in the AndroidManifest.xml to determine which activity to launch, and how to launch it. In this case, it’s a class named MainActivity:
<activity
          android:name=".MainActivity"
          android:label="@string/app_name"
          android:theme="@style/Theme.AndroidSandbox.NoActionBar">
    <intent-filter>
      <action android:name="android.intent.action.MAIN"/>
      <category android:name="android.intent.category.LAUNCHER"/>
    </intent-filter>
</activity>
The MainActivity is a class that extends AppCompatActivity. This is a base class that supports all modern Android features while providing backward compatibility with older versions of Android. For compatibility with older version of Android, you should always use AppCompatActivity as a base class.
Our base class contains a number of methods. The onCreate() method is the first method that is called when the MainActivity is instantiated. Here’s a basic onCreate() method:
class MainActivity : AppCompatActivity() {
  override fun onCreate(savedInstanceState: Bundle?) {
    super.onCreate(savedInstanceState)
    setContentView(R.layout.activity_main) // this inflates the activity_main
    // ...
  }
Activities typically have an associated layout file which describes their appearance. The activity and the layout are connected by a process known as layout inflation. When the activity starts, the views that are defined in the XML layout files are turned into (or “inflated” into) Kotlin view objects in memory. Once this happens, the activity can draw these objects to the screen and also dynamically modify them 6.
R.layout.activity_main in this example corresponds to the layout/activity_main.xml file. That file contains the full layout for the screen, including the top toolbar. There are multiple pieces to this particular layout, so the line <include layout="@layout/content_main"/> is including the contents of a second layout file (just split up to make it easier to manage).
<?xml version="1.0" encoding="utf-8"?>
<androidx.coordinatorlayout.widget.CoordinatorLayout
        xmlns:android="http://schemas.android.com/apk/res/android"
        xmlns:app="http://schemas.android.com/apk/res-auto"
        xmlns:tools="http://schemas.android.com/tools"
        android:layout_width="match_parent"
        android:layout_height="match_parent"
        tools:context=".MainActivity">

    <com.google.android.material.appbar.AppBarLayout
            android:layout_height="wrap_content"
            android:layout_width="match_parent"
            android:theme="@style/Theme.AndroidSandbox.AppBarOverlay">

        <androidx.appcompat.widget.Toolbar
                android:id="@+id/toolbar"
                android:layout_width="match_parent"
                android:layout_height="?attr/actionBarSize"
                android:background="?attr/colorPrimary"
                app:popupTheme="@style/Theme.AndroidSandbox.PopupOverlay"/>

    </com.google.android.material.appbar.AppBarLayout>

    <include layout="@layout/content_main"/>

    <com.google.android.material.floatingactionbutton.FloatingActionButton
            android:id="@+id/fab"
            android:layout_width="wrap_content"
            android:layout_height="wrap_content"
            android:layout_gravity="bottom|end"
            android:layout_margin="@dimen/fab_margin"
            app:srcCompat="@android:drawable/ic_dialog_email"/>

</androidx.coordinatorlayout.widget.CoordinatorLayout>
Applications consist of one or more running activities, each one corresponding to a screen.
Activities in the system are managed as activity stacks. When a new activity is started, it is usually placed on the top of the current stack and becomes the running activity – the previous activity always remains below it in the stack, and will not come to the foreground again until the new activity exits.
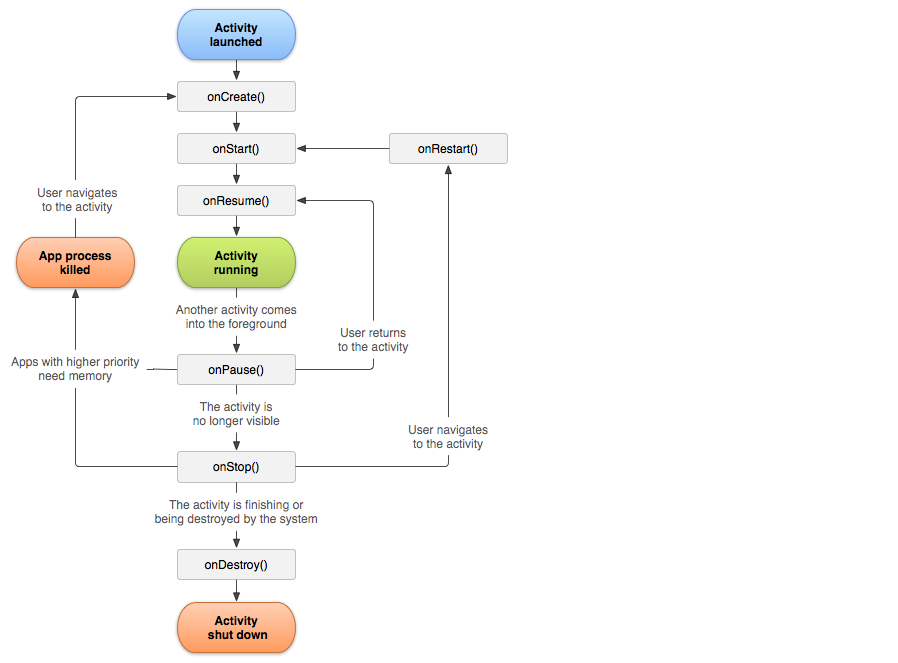
An activity can be one of the following running states:
- The activity in the foreground, typically the one that user is able to interact with, is running.
- An activity that has lost focus but can still be seen is visible. It will remain active.
- An activity that is completely hidden, or minimized is stopped. It retains its state (it’s basically paused) BUT the OS may choose to terminate it to free up resources.
- The OS can choose to destroy an application to free up resources.
This diagram shows the possible states:
https://developer.android.com/reference/android/app/Activity#Fragments
These phases correspond to the following callback methods. You can override a method in your Activity to add code that will get exexuted when the applicaiton enters or exits a particular stage:
 public class Activity extends ApplicationContext {
     protected void onCreate(Bundle savedInstanceState);
     protected void onStart();
     protected void onRestart();
     protected void onResume();
     protected void onPause();
     protected void onStop();
     protected void onDestroy();
 }
There are three key loops that these phases attempt to capture:
-
The entire lifetime of an activity happens between the first call to
onCreate(Bundle)through to a single final call toonDestroy(). An activity will do all setup of “global” state in onCreate(), and release all remaining resources in onDestroy(). For example, if it has a thread running in the background to download data from the network, it may create that thread in onCreate() and then stop the thread in onDestroy(). -
The visible lifetime of an activity happens between a call to
onStart()until a corresponding call toonStop(). During this time the user can see the activity on-screen, though it may not be in the foreground and interacting with the user. Between these two methods you can maintain resources that are needed to show the activity to the user. For example, you can register aBroadcastReceiverin onStart() to monitor for changes that impact your UI, and unregister it in onStop() when the user no longer sees what you are displaying. The onStart() and onStop() methods can be called multiple times, as the activity becomes visible and hidden to the user. -
The foreground lifetime of an activity happens between a call to
onResume()until a corresponding call toonPause(). During this time the activity is in visible, active and interacting with the user. An activity can frequently go between the resumed and paused states – for example when the device goes to sleep, when an activity result is delivered, when a new intent is delivered – so the code in these methods should be fairly lightweight.https://developer.android.com/reference/android/app/Activity#Fragments
The configuation represents the screen resolution and layout. If the configuration changes at runtime (e.g. the user rotates the device to a new orientation), then the current activity is destroyed and recreated, following the lifecycle above. This is done because the orientation change will require you to reload layout files and other resources to align with the new layout.
To avoid losing data when this happens, you should expect to save your data anytime your activity pauses (i.e. onPause() is called).
A task is a collection of activities that users interact with when performing a certain job. The activities are arranged in a stack—the back stack)—in the order in which each activity is opened. For example, an email app might have one activity to show a list of new messages. When the user selects a message, a new activity opens to view that message. This new activity is added to the back stack. If the user presses the Back button, that new activity is finished and popped off the stack.
The device Home screen is the starting place for most tasks. When the user touches an icon in the app launcher (or a shortcut on the Home screen), that app’s task comes to the foreground. If no task exists for the app (the app has not been used recently), then a new task is created and the “main” activity for that app opens as the root activity in the stack.
The device Home screen is the starting place for most tasks. When the user touches an icon in the app launcher (or a shortcut on the Home screen), that app’s task comes to the foreground. If no task exists for the app (the app has not been used recently), then a new task is created and the “main” activity for that app opens as the root activity in the stack.
When the current activity starts another, the new activity is pushed on the top of the stack and takes focus. The previous activity remains in the stack, but is stopped. When an activity stops, the system retains the current state of its user interface. When the user presses the Back button, the current activity is popped from the top of the stack (the activity is destroyed) and the previous activity resumes (the previous state of its UI is restored). Activities in the stack are never rearranged, only pushed and popped from the stack—pushed onto the stack when started by the current activity and popped off when the user leaves it using the Back button. As such, the back stack operates as a “last in, first out” object structure.
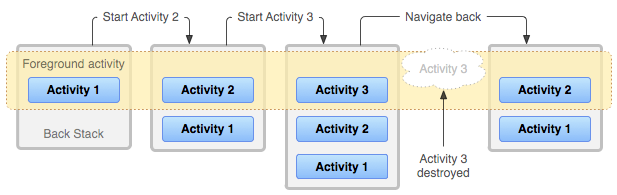
If the user continues to press Back, then each activity in the stack is popped off to reveal the previous one, until the user returns to the Home screen (or to whichever activity was running when the task began). When all activities are removed from the stack, the task no longer exists.
This is standard behaviour for most applications. For unusual workflows, you can manually manage tasks.
A Fragment represents a reusable portion of your app’s UI. A fragment defines and manages its own layout, has its own lifecycle, and can handle its own input events. Fragments cannot live on their own–they must be hosted by an activity or another fragment. The fragment’s view hierarchy becomes part of, or attaches to, the host’s view hierarchy.
Fragments introduce modularity and reusability into your activity’s UI by allowing you to divide the UI into discrete chunks. Activities are an ideal place to put global elements around your app’s user interface, such as a navigation drawer. Conversely, fragments are better suited to define and manage the UI of a single screen or portion of a screen.

A fragment represents a modular portion of the user interface within an activity. A fragment has its own lifecycle, receives its own input events, and you can add or remove fragments while the containing activity is running.
To create a fragment, extend the AndroidX Fragment class, and override its methods to insert your app logic, similar to the way you would create an Activity class. To create a minimal fragment that defines its own layout, provide your fragment’s layout resource to the base constructor, as shown in the following example:
class ExampleFragment : Fragment(R.layout.example_fragment)
Generally, your fragment must be embedded within an AndroidX FragmentActivity to contribute a portion of UI to that activity’s layout. FragmentActivity is the base class for AppCompatActivity, so if you’re already subclassing AppCompatActivity to provide backward compatibility in your app, then you do not need to change your activity base class.
You can add your fragment to the activity’s view hierarchy either by defining the fragment in your activity’s layout file or by defining a fragment container in your activity’s layout file and then programmatically adding the fragment from within your activity.
Here’s an example activity layout containing a single FragmentContainerView:
<!-- res/layout/example_activity.xml -->
<androidx.fragment.app.FragmentContainerView
    xmlns:android="http://schemas.android.com/apk/res/android"
    android:id="@+id/fragment_container_view"
    android:layout_width="match_parent"
    android:layout_height="match_parent"
    android:name="com.example.ExampleFragment" />
The android:name attribute specifies the class name of the Fragment to instantiate. When the activity’s layout is inflated, the specified fragment is instantiated, onInflate() is called on the newly instantiated fragment.
To programmatically add a fragment to your activity’s layout, the layout should include a FragmentContainerView to serve as a fragment container, as shown in the following example:
<!-- res/layout/example_activity.xml -->
<androidx.fragment.app.FragmentContainerView
    xmlns:android="http://schemas.android.com/apk/res/android"
    android:id="@+id/fragment_container_view"
    android:layout_width="match_parent"
    android:layout_height="match_parent" />
While your activity is running, you can make fragment transactions such as adding, removing, or replacing a fragment. In your FragmentActivity, you can get an instance of the FragmentManager, which can be used to create a FragmentTransaction.
An intent is an asynchronous message, that represents an an operation to be performed. This can include activating components, or activities. An intent is created with an Intent object, which defines a message to activate either a specific component (explicit intent) or a specific type of component (implicit intent).
Applications then, consist of a number of different component working together. Some of them you will create, and some are preexisting components that you can activate (e.g. you can create an intent requesting that the camera take a picture; you don’t need to write code to make that happen, you just need to use the intent to ask someone else to take it for you and return the data).
Similarly, intents can be used to activate an Activity. The startActivity(Intent) method is used to start a new activity, which will be placed at the top of the activity stack. It takes a single argument, an Intent, which describes the activity to be executed. To be of use with Context.startActivity(), all activity classes must have a corresponding <activity>declaration in their package’s AndroidManifest.xml.
Sometimes you want to get a result back from an activity when it ends. For example, you may start an activity that lets the user pick a person in a list of contacts; when it ends, it returns the person that was selected. To do this, you call the startActivityForResult(Intent, int) version with a second integer parameter identifying the call. The result will come back through your onActivityResult(int, int, Intent)method.
Parcelable and Bundle objects are intended to be used across process boundaries such as with IPC/Binder transactions, between activities with intents, and to store transient state across configuration changes.
When an app creates an Intent object to use in startActivity(android.content.Intent) in starting a new Activity, the app can pass in parameters using the putExtra(java.lang.String, java.lang.String) method. This creates a bundle that is passed to the new Activity (and automatically unpackaged by the new Activity).
val intent = Intent(this, MyActivity::class.java).apply {
    putExtra("media_id", "43587")
    // ...
}
startActivity(intent) // launch new intent with bundle
The OS parcels the underlying Bundle of the intent. Then, the OS creates the new activity, un-parcels the data, and passes the intent to the new activity, which can fetch the data from the intent.
class MyActivity {
  	// intent is available to the new activity
    override fun onCreate(savedInstanceState: Bundle?) {
        super.onCreate(savedInstanceState)
        setContentView(R.layout.myactivity)

        val intent: Intent = getIntent()
        val v: Int = intent.getIntExtra("media_id", 0)
        // v == 43587
    }
Android applications tend to have a lot of system-generated resources, and rely heavily on Gradle. It’s highly recommended that you use the IntelliJ or Android Studio “New Project wizard” to create a new project.
In your IDE, select File - New - Android project.
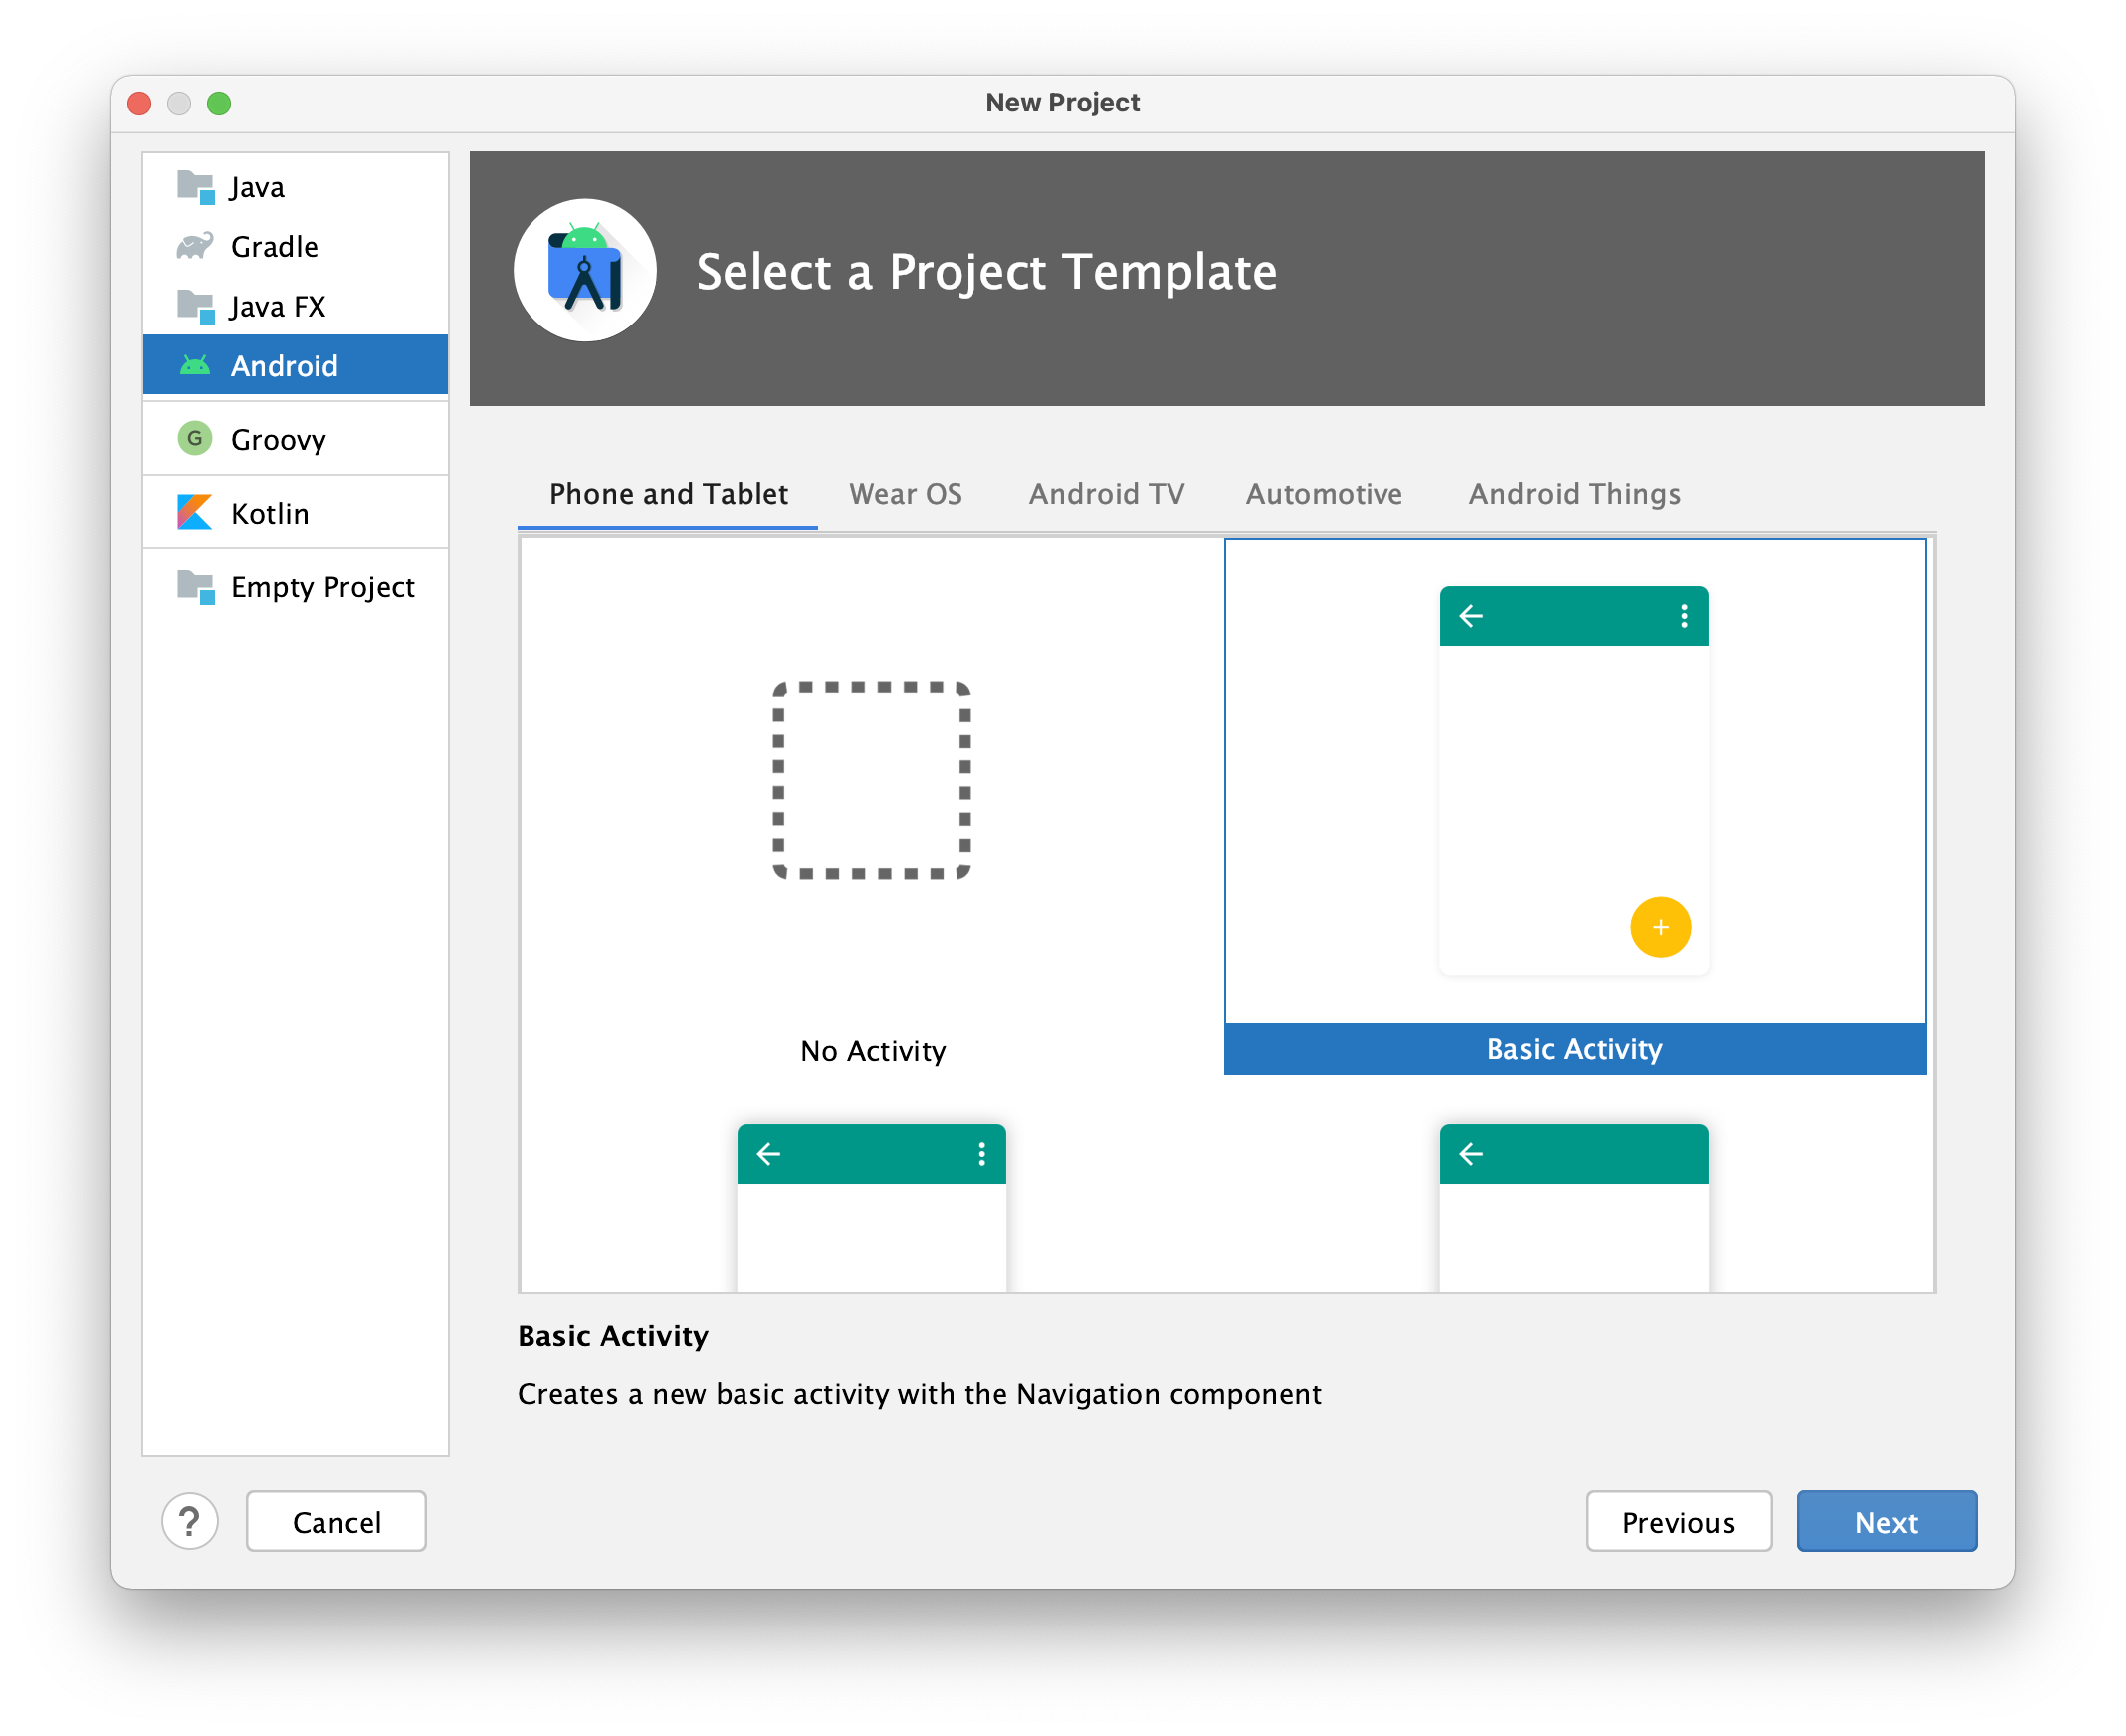
Choosing Basic Activity will get you a “Hello World” style application that can be a useful starting point for your project.
Android uses Gradle, so the project structure should look similiar to earlier projects. Expand the Project folder (CMD-1 or Ctrl-1) to see the contents of the project 7.
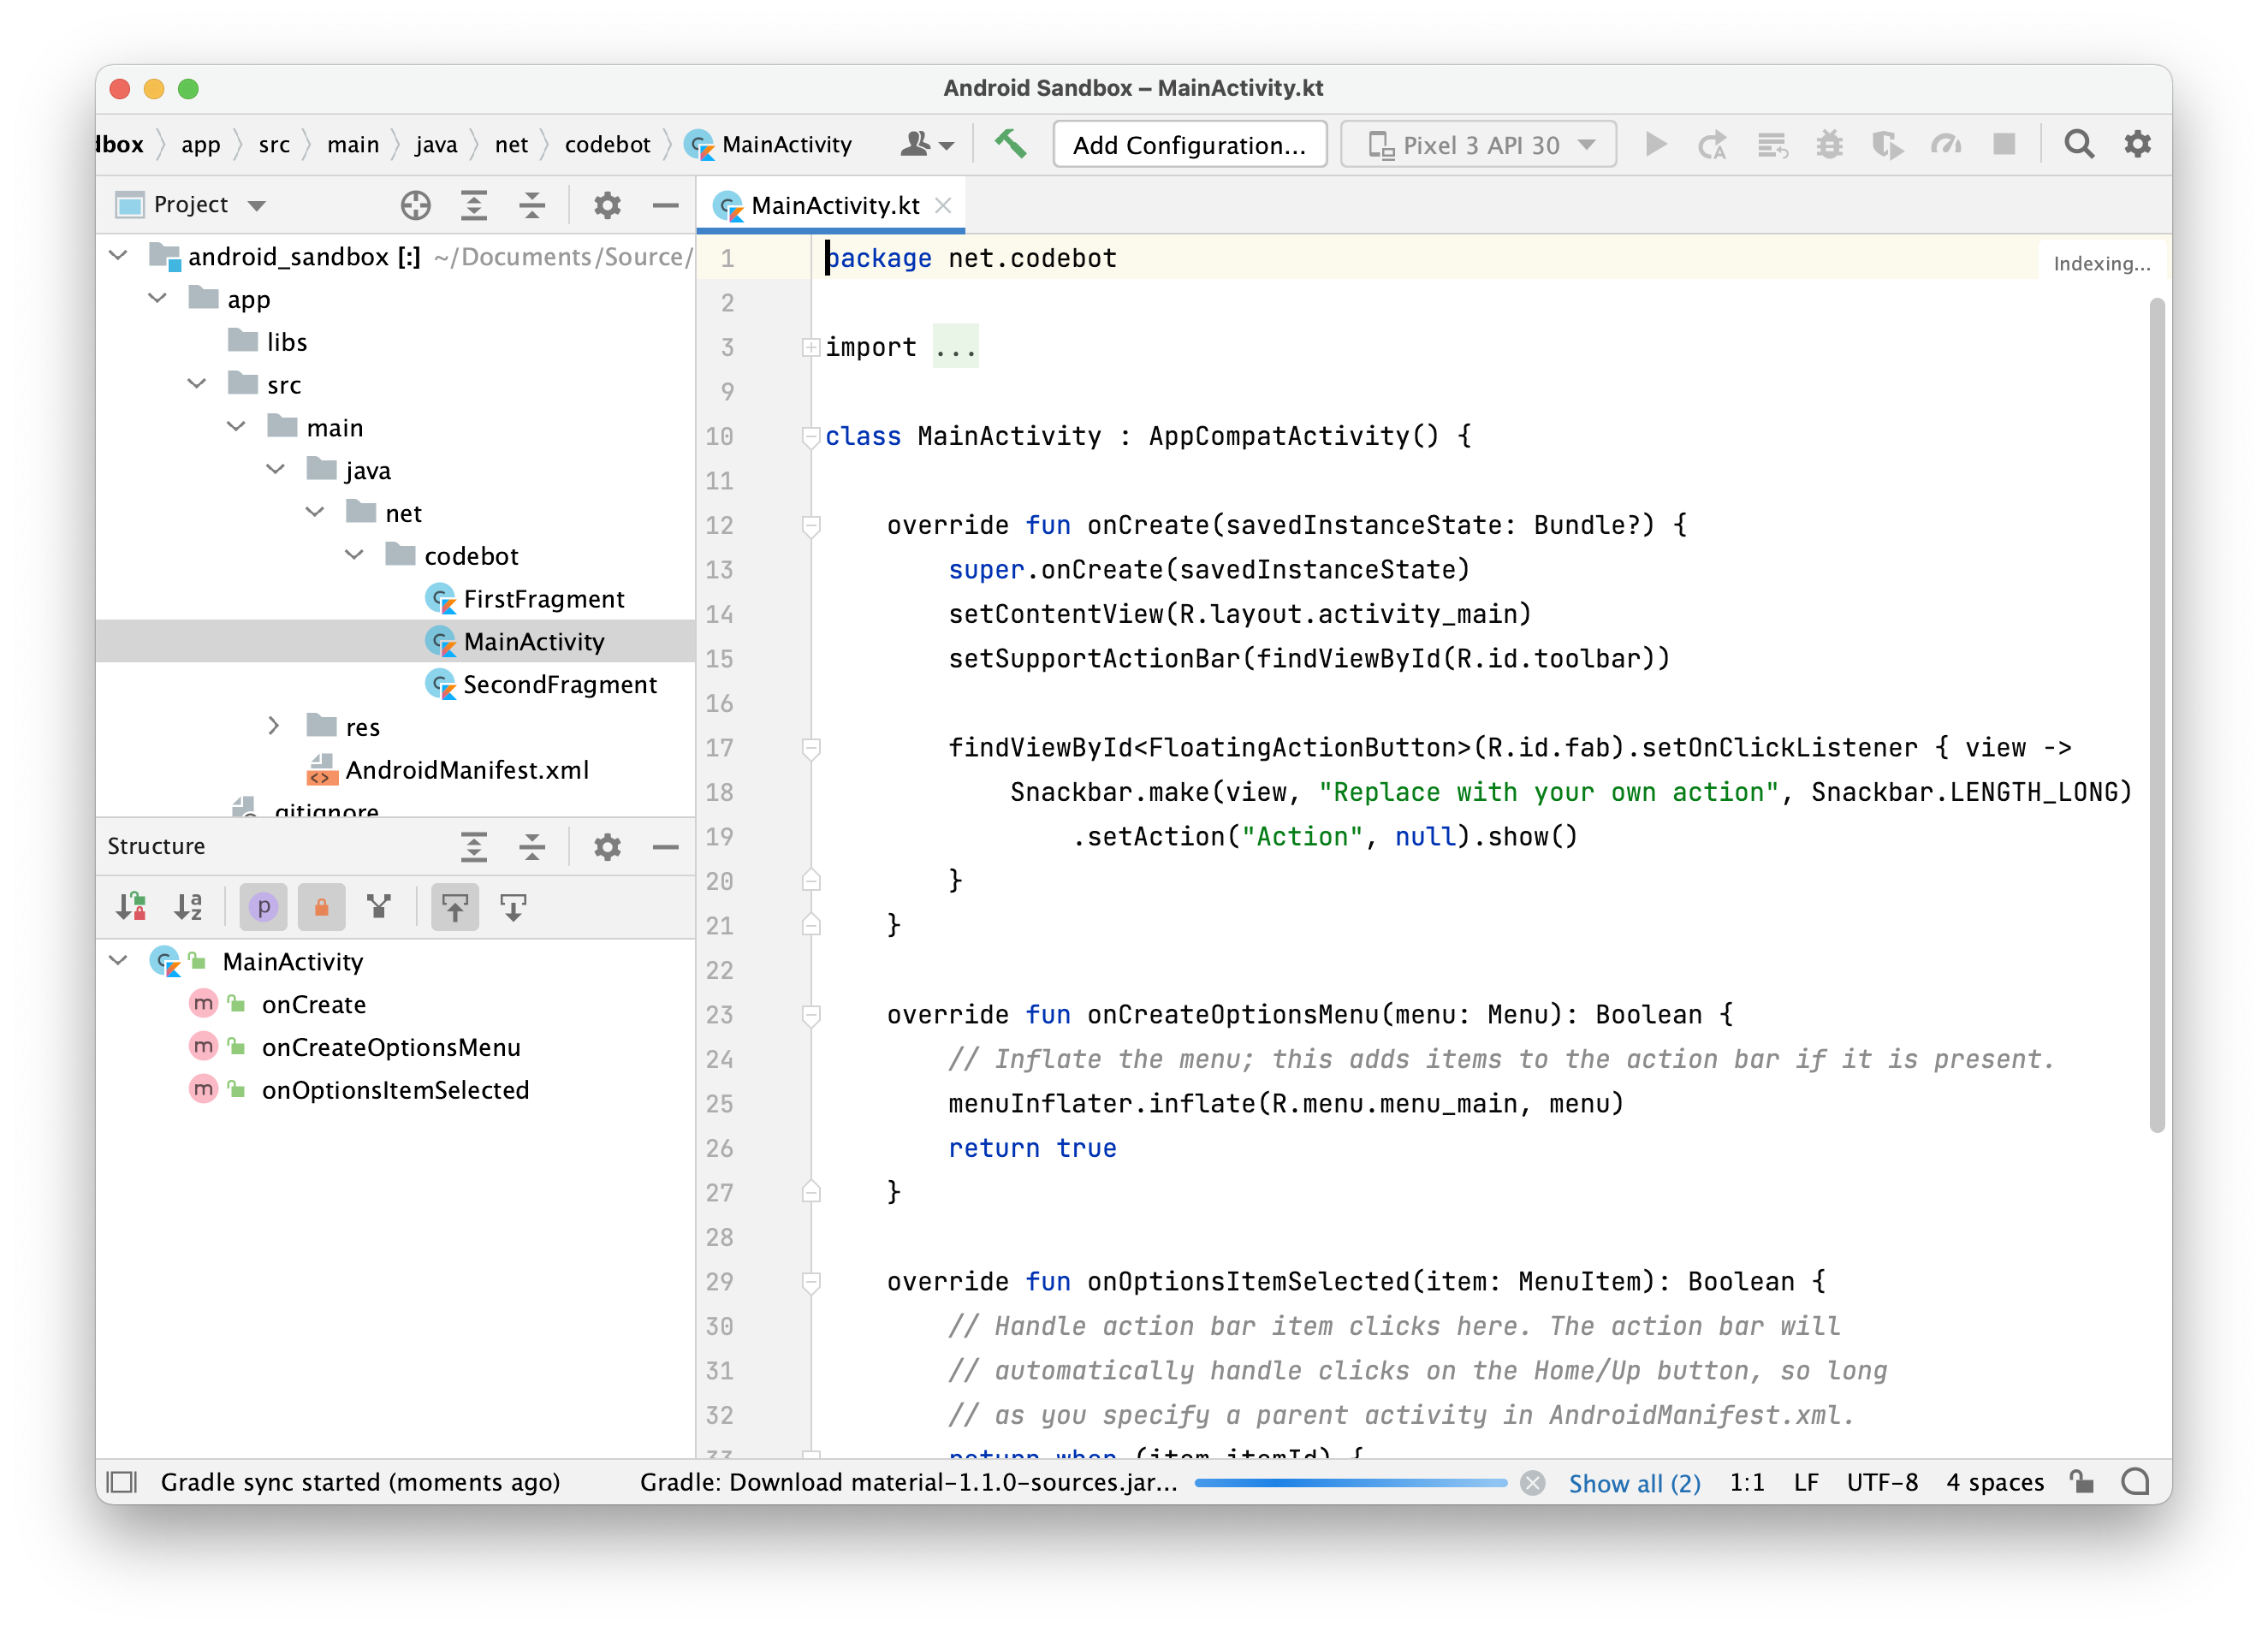
The src folder contains source code, nested into a directory structure that matches the package name of your classes. In the example above, src/main/java is the top level source code folder, and net.codebot is the package name. FirstFragment, MainActivity and SecondFragment are classes that exist in this project.
The res folder contains resources for your project: sounds, images and other useful files that aren’t source code.

Resources in Android also include XML files, which are commonly used to store application data. The following subfolders are used:
- The
drawablefolder contains images that you wish to draw on-screen (directly, or on a widget). It also contains default icons for your application. - Under the
layoutfolder, we have XML files represent a screen layout. IntelliJ IDEA includes a GUI builder for creating layouts and saving them as XML. These can be loaded dynamically to instantiate a screen at runtime. - The
valuesfolder contains XML files with application constants: colours, themes, titles, help text etc.
The AndroidManifest.xml file is generated with your project; one is reproduced below. This file contains settings that tell the application how to present itself on Android e.g. icon, label, theme. The activity element tells is which class to launch when the application launches. Other permissions and settings can be added in here as-needed.
You should be very careful when modifying this file! If you remove critical settings, or break the formatting, your project may not build.
<?xml version="1.0" encoding="utf-8"?>
<manifest xmlns:android="http://schemas.android.com/apk/res/android"
          package="net.codebot">

    <application
            android:allowBackup="true"
            android:icon="@mipmap/ic_launcher"
            android:label="@string/app_name"
            android:roundIcon="@mipmap/ic_launcher_round"
            android:supportsRtl="true"
            android:theme="@style/Theme.AndroidSandbox">
        <activity
                android:name=".MainActivity"
                android:label="@string/app_name"
                android:theme="@style/Theme.AndroidSandbox.NoActionBar">
            <intent-filter>
                <action android:name="android.intent.action.MAIN"/>

                <category android:name="android.intent.category.LAUNCHER"/>
            </intent-filter>
        </activity>
    </application>

</manifest>
When you build an Android executable, it compiles your code along with any required data or resources files into an APK file, an archive file with an .apk suffix. This is installed on the device automatically by the IDE.
To do this, select “Build - Build Project”. If you attempt to “Run” it, IntelliJ will look for an active Android device, and prompt you to install on that device. If you have an Android device set to Debug mode, it should appear as an option. In many cases, you will want to install and run your application on a virtual device instead.
The Android SDK includes support for virtual devices that mimic actual Android systems, which you can use for testing.
To install an Android Virtual Device (AVD), select “Tools - Android - AVD Manager” in IntelliJ, and walkthrough the installation.

“Run” the device, click on the Power button and it should power up! When running your application, you can choose the virtual device (AVD) as the target, and IntelliJ will install and execute your code on the AVD.
Android provides a set of prebuilt widgets that allow you to quickly compose an interface8. Android refers to these as Views.
All elements in the user interface are built using a hierarchy of View and ViewGroup objects. A View usually draws something the user can see and interact with. A ViewGroup is a container that defines the layout structure for View and otherViewGroup objects.

The View objects are usually called “widgets” in other toolkits, and can be one of many subclasses, such as Button or TextView. The ViewGroup objects are usually called “layouts” can be one of many types that provide a different layout structure, such as LinearLayout or RelativeLayout.
You can declare a layout in two ways:
-
Declare UI elements in XML. Android provides a straightforward XML vocabulary that corresponds to the View classes and subclasses, such as those for widgets and layouts.
You can also use IntelliJ or Android Studio’s Layout Editor to build your XML layout using a drag-and-drop interface. This will generate the XML file for you.
-
Instantiate layout elements at runtime. Your app can instantiate View and ViewGroup objects (and manipulate their properties) programmatically.
Declaring your UI in XML allows you to separate the presentation of your app from the code that controls its behavior. Using XML files also makes it easy to provide different layouts for different screen sizes and orientations
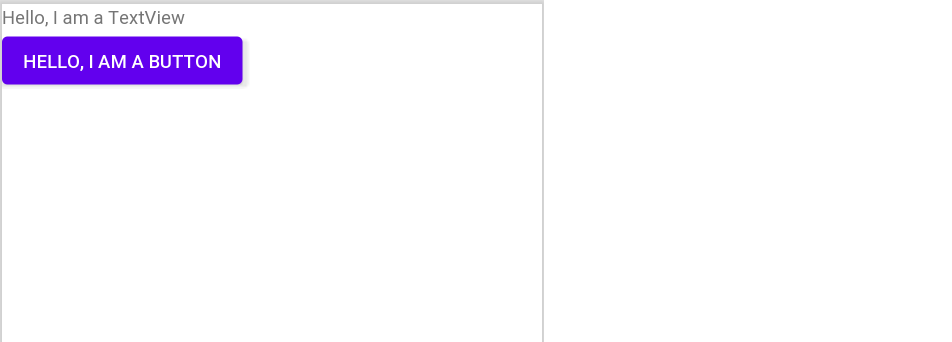
Android’s layout files can be written as XML, describing a hierarchy of viewgroups and views. Here’s an example of a LinearLayout (which flows top-to-bottom) holding TextView and Button widgets.
<?xml version="1.0" encoding="utf-8"?>
<LinearLayout xmlns:android="http://schemas.android.com/apk/res/android"
              android:layout_width="match_parent"
              android:layout_height="match_parent"
              android:orientation="vertical" >
    <TextView android:id="@+id/text"
              android:layout_width="wrap_content"
              android:layout_height="wrap_content"
              android:text="Hello, I am a TextView" />
    <Button android:id="@+id/button"
            android:layout_width="wrap_content"
            android:layout_height="wrap_content"
            android:text="Hello, I am a Button" />
</LinearLayout>
Any View object may have an unique integer ID associated with it. Within a layout, it is standard practice to assign a unique String name to a View, which is converted to a unique integer when it’s compiled.
The standard notation in a XML layout file to use this attribute:
android:id="@+id/my_button"
The at-symbol (@) at the beginning of the string indicates that the XML parser should parse and expand the rest of the ID string and identify it as an ID resource. The plus-symbol (+) means that this is a new resource name that must be created and added to our resources
For example, when defining a new button as part of our layout:
<Button android:id="@+id/my_button"
        android:layout_width="wrap_content"
        android:layout_height="wrap_content"
        android:text="@string/my_button_text"/>
When compiled, each layout file is compiled into a View resource that can be dynamically loaded. In your Activity’s onCreate() method, you should call setContentView() to load your starting view. These can be changed at anytime by calling setContentView() with the new view’s ID.
fun onCreate(savedInstanceState: Bundle) {
    super.onCreate(savedInstanceState)
    setContentView(R.layout.main_layout)
}
XML layout attributes named layout_*something* define layout parameters for the View. All view groups include a width and height (layout_width and layout_height), and each view is required to define them.
You can specify width and height with exact measurements, though you probably won’t want to do this often. More often, you will use one of these constants to set the width or height:
- wrap_content tells your view to size itself large enough to hold its content.
- match_parent tells your view scale to the size of its parent.
In general, you never want to supply width and height as pixel values (Android will accept this, but then your application is tied to a particular physical resolution). If you need to supply values, use density-independent pixel units (dp).
ConstraintLayout allows you to create large and complex layouts with a flat view hierarchy (no nested view groups). It’s similar to RelativeLayout in that all views are laid out according to relationships between sibling views and the parent layout, but it’s more flexible than RelativeLayout and easier to use with Android Studio’s Layout Editor.
All the power of ConstraintLayout is available directly from the Layout Editor’s visual tools, because the layout API and the Layout Editor were specially built for each other. So you can build your layout with ConstraintLayout entirely by drag-and-dropping instead of editing the XML.
To define a view’s position in ConstraintLayout, you must add at least one horizontal and one vertical constraint for the view. Each constraint represents a connection or alignment to another view, the parent layout, or an invisible guideline. Each constraint defines the view’s position along either the vertical or horizontal axis; so each view must have a minimum of one constraint for each axis, but often more are necessary.

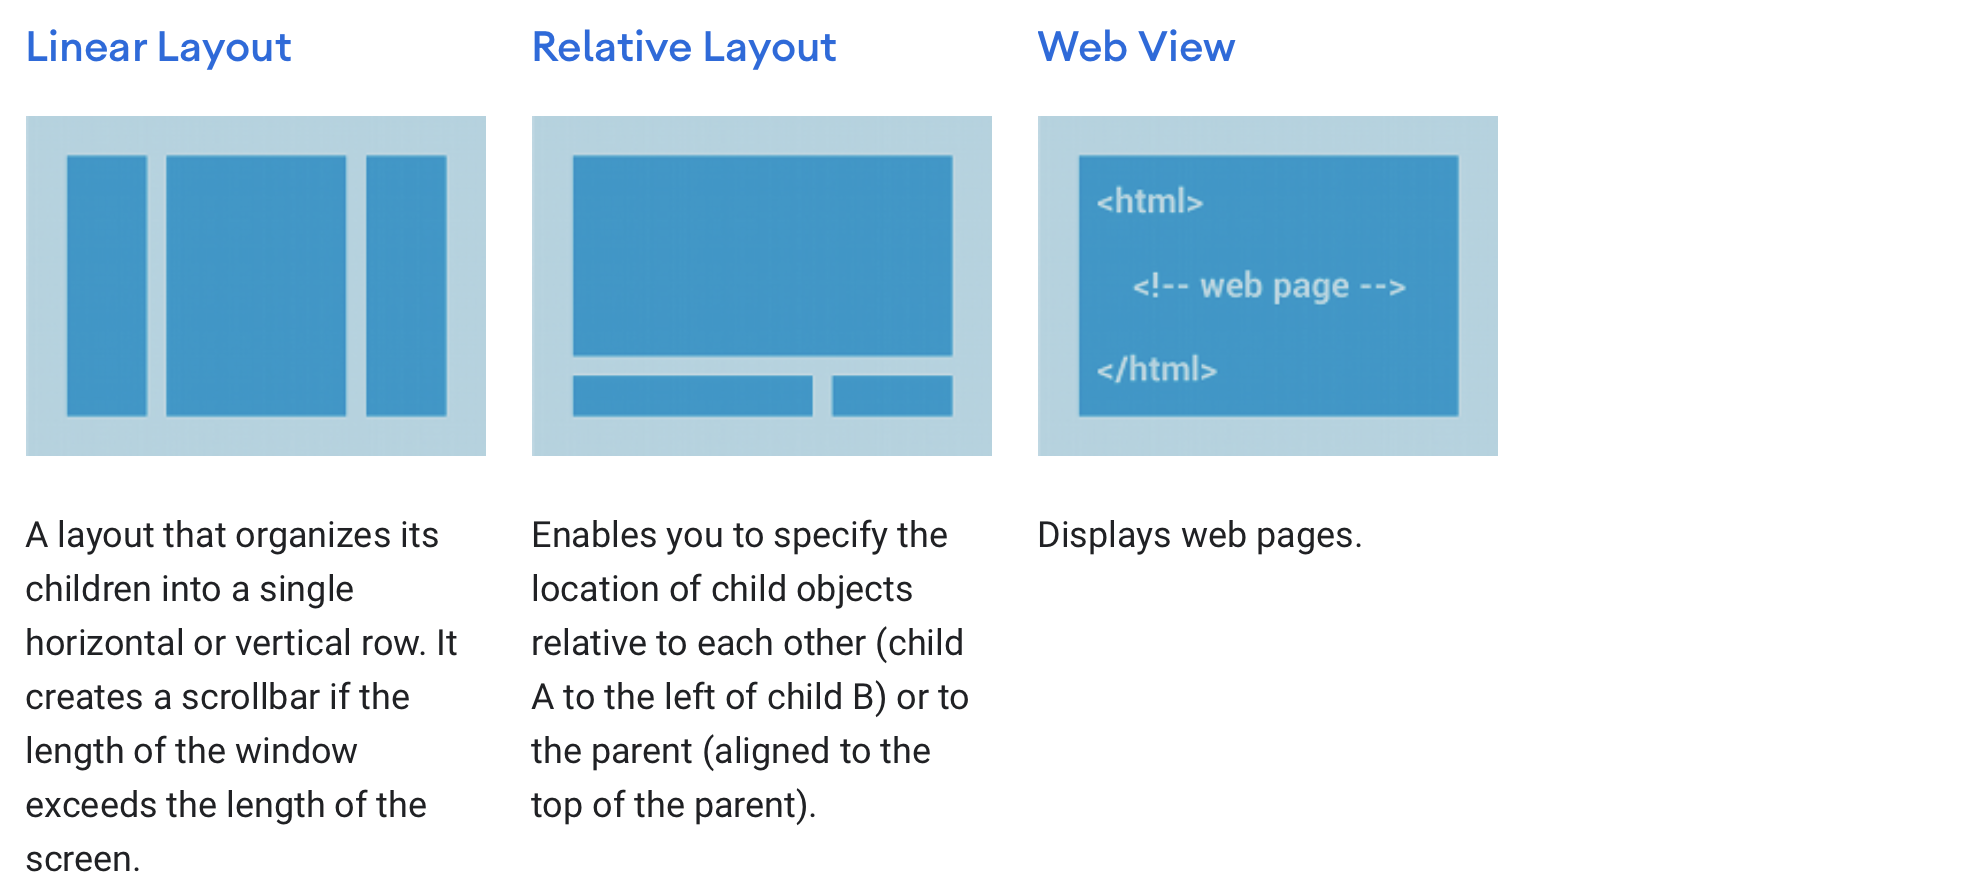
There are three fixed layouts that are also supported: LinearLayout, RelativeLayout and WebView. These are all subclasses of ViewGroup. The diagram below shows how they handle View layout.
When the content for your layout is dynamic or not pre-determined, you can use a layout that subclasses AdapterView to populate the layout with views at runtime. A subclass of the AdapterView class uses an Adapter to bind data to its layout. The Adapter behaves as a middleman between the data source and the AdapterView layout—the Adapter retrieves the data (from a source such as an array or a database query) and converts each entry into a view that can be added into the AdapterView layout.
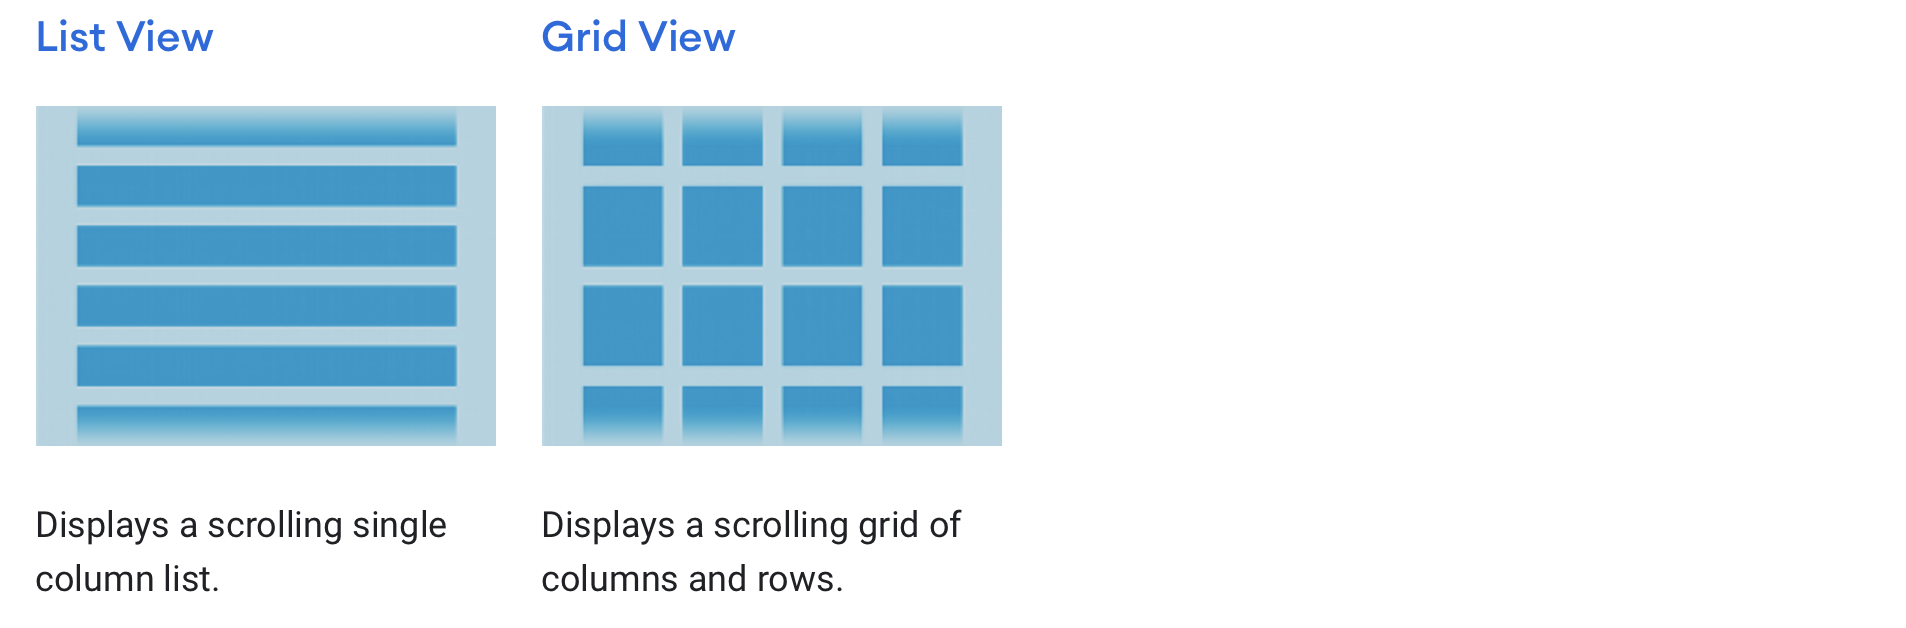
AdapterViews include ListView and GridView.
You can populate an AdapterView such as ListView or GridView by binding the AdapterView instance to an Adapter, which retrieves data from an external source and creates a View that represents each data entry.
For example, use an ArrayAdapter when your data source is an array. By default, ArrayAdapter creates a view for each array item by calling toString() on each item and placing the contents in a TextView.
If you have an array of strings you want to display in a ListView, initialize a new ArrayAdapter using a constructor to specify the layout for each string and the string array:
val adapter = ArrayAdapter<String>(this, android.R.layout.simple_list_item_1, myStringArray)
The arguments for this constructor are:
- Your app
Context - The layout that contains a
TextViewfor each string in the array - The string array
Then simply call setAdapter() on your ListView:
val listView: ListView = findViewById(R.id.listview)
listView.adapter = adapter
Widgets are contained in the android.view.widget package. Notable widgets include TextView, EditText, RadioButton, CheckBox, Spinners and others.
Widgets have properties that determine how they are displayed and interact (as expected).
Event handlers can be associated with widgets (views), much as they are with other toolkits, but are modified to reflect touch interaction over mouse interaction.
For example, we can attach a clickListener to a widget programatically.
val button = findViewById(R.id.btnAlarm) as Button
button.setOnClickListener(event -> {
  public void onClick(View v) {
    // Do something in response to button click
  }
})
We can also define handlers as layout properties (i.e. in XML layout files).
<Button android:id="@+id/btnAlarm"
        android:onClick="sendMessage"/>

// handler function always has view parameter
fun sendMessage(view: View) {
	// Do something in response to button click
}
One major challenge when working with Android is the need to handle lifecycle changes: activities can be paused or stopped, and fragments can go out-of-scope. This makes data sharing between components very difficult.
There’s numerous ways to address this, including saving data to a bundle, or manually persisting to a data store. Jetpack Compose introduces classes to manage this for us.
The ViewModel class is designed to store and manage UI-related data in a lifecycle conscious way. The ViewModelclass allows data to survive configuration changes such as screen rotations.
Assigning excessive responsibility to UI controllers can result in a single class that tries to handle all of an app’s work by itself, instead of delegating work to other classes. Assigning excessive responsibility to the UI controllers in this way also makes testing a lot harder.
It’s easier and more efficient to separate out view data ownership from UI controller logic.
Architecture Components provides ViewModel helper class for the UI controller that is responsible for preparing data for the UI. ViewModel objects are automatically retained during configuration changes so that data they hold is immediately available to the next activity or fragment instance. For example, if you need to display a list of users in your app, make sure to assign responsibility to acquire and keep the list of users to a ViewModel, instead of an activity or fragment.
class MyViewModel : ViewModel() {
    private val users: MutableLiveData<List<User>> by lazy {
        MutableLiveData<List<User>>().also {
            loadUsers()
        }
    }

    fun getUsers(): LiveData<List<User>> {
        return users
    }

    private fun loadUsers() {
        // Do an asynchronous operation to fetch users.
    }
}
You can then access the list from an activity as follows:
class MyActivity : AppCompatActivity() {

    override fun onCreate(savedInstanceState: Bundle?) {
        // Create a ViewModel the first time the system calls an activity's onCreate() method.
        // Re-created activities receive the same MyViewModel instance created by the first activity.

        // Use the 'by viewModels()' Kotlin property delegate
        // from the activity-ktx artifact
        val model: MyViewModel by viewModels()
        model.getUsers().observe(this, Observer<List<User>>{ users ->
            // update UI
        })
    }
}
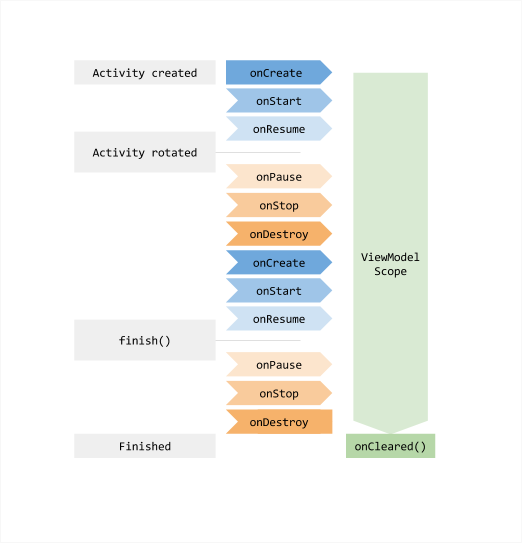
If the activity is re-created, it receives the same MyViewModel instance that was created by the first activity. When the owner activity is finished, the framework calls the ViewModel objects’s onCleared() method so that it can clean up resources.
ViewModel objects are scoped to the Lifecycle passed to the ViewModelProvider when getting the ViewModel. The ViewModel remains in memory until the Lifecycle it’s scoped to goes away permanently: in the case of an activity, when it finishes, while in the case of a fragment, when it’s detached.
Figure 1 illustrates the various lifecycle states of an activity as it undergoes a rotation and then is finished. The illustration also shows the lifetime of the ViewModel next to the associated activity lifecycle. This particular diagram illustrates the states of an activity. The same basic states apply to the lifecycle of a fragment.
It’s very common that two or more fragments in an activity need to communicate with each other.
This can be addressed by using ViewModel objects. Fragments can share a ViewModelusing their activity scope to handle this communication.
class SharedViewModel : ViewModel() {
    val selected = MutableLiveData<Item>()

    fun select(item: Item) {
        selected.value = item
    }
}

class ListFragment : Fragment() {

    private lateinit var itemSelector: Selector

    // Use the 'by activityViewModels()' Kotlin property delegate
    // from the fragment-ktx artifact
    private val model: SharedViewModel by activityViewModels()

    override fun onViewCreated(view: View, savedInstanceState: Bundle?) {
        super.onViewCreated(view, savedInstanceState)
        itemSelector.setOnClickListener { item ->
            // Update the UI
        }
    }
}

class DetailFragment : Fragment() {

    // Use the 'by activityViewModels()' Kotlin property delegate
    // from the fragment-ktx artifact
    private val model: SharedViewModel by activityViewModels()

    override fun onViewCreated(view: View, savedInstanceState: Bundle?) {
        super.onViewCreated(view, savedInstanceState)
        model.selected.observe(viewLifecycleOwner, Observer<Item> { item ->
            // Update the UI
        })
    }
}
-
Portions of this chapter are taken from the Android Developer documentation. Links are provided to the relevant sections below. ↩︎
-
The smallest “reasonable” notebook would be around 13", which is the size of the largest tablet on the market. Smartphones tend to be 4-6" diagonally , which is considerably smaller. ↩︎
-
Android and iOS have converged to support very similar gestures. If you know how to use one mobile OS, you can generally use the other. ↩︎
-
https://developer.android.com/guide/components/fundamentals ↩︎
-
Yes, IntelliJ creates a Java folder to hold Kotlin source code. No, I don’t know why it does this, although I suspect it’s considered “default” behaviour for an older build system. You can manually add a
kotlinfolder if you wish, just change the “source root” to point to your new folder. ↩︎ -
Excerpts from the Android documentation. https://developer.android.com/guide/topics/ui/declaring-layout ↩︎