
A2 Lightbox
A lightbox (aka light table) is a flat backlit surface that is used to present items placed on its surface. Before digital photography, lightboxes were commonly used to view photographic slides.

You’re going to implement a photo lightbox-style application for digital photos using Kotlin/Java FX. Your program will allow a user to browse and select images from their computer, place then on-screen, scale and rotate them.
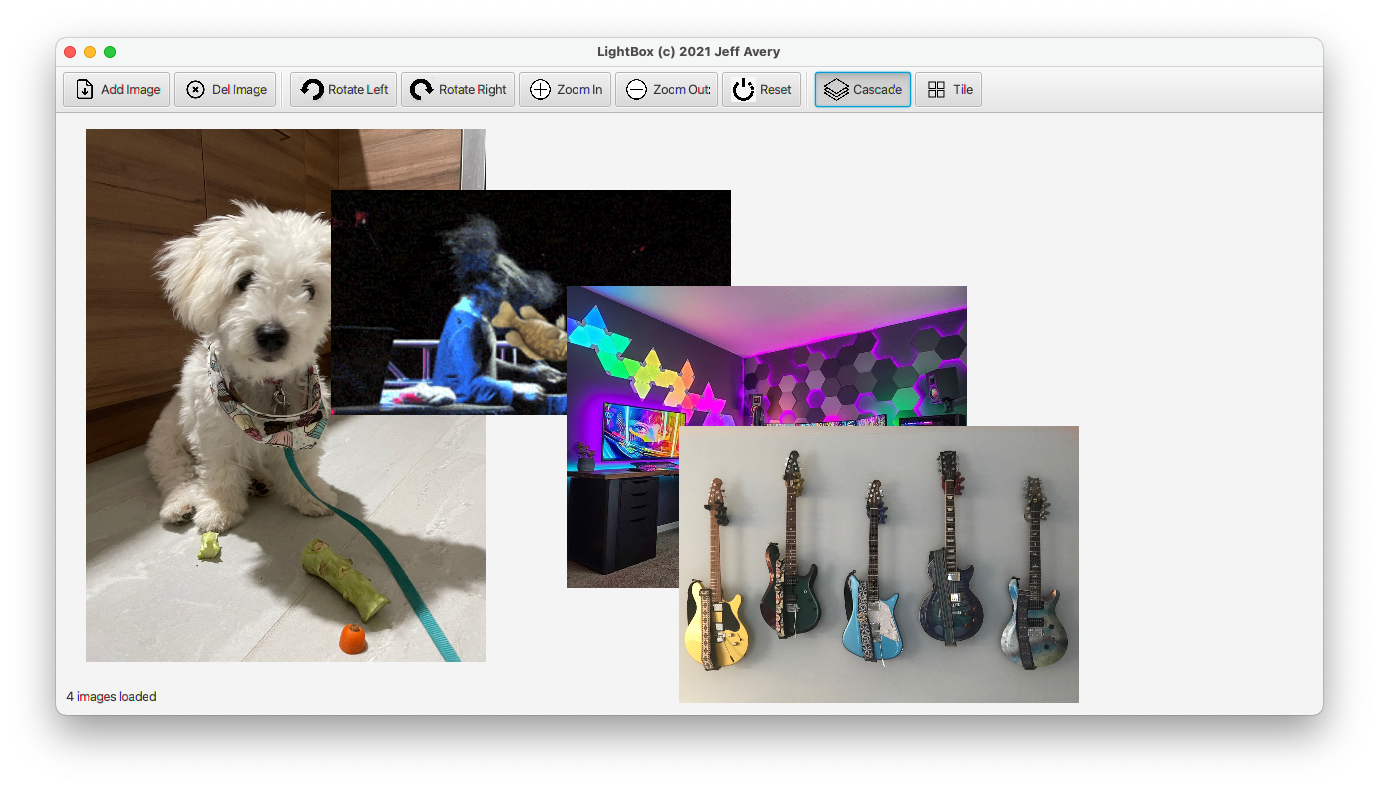
This is a rough mockup that illustrates the features that you will implement, and the basic layout that you must use.
- Construct an interface using Kotlin and Java FX components and layouts.
- Support image interaction including translation, scaling and rotation of images.
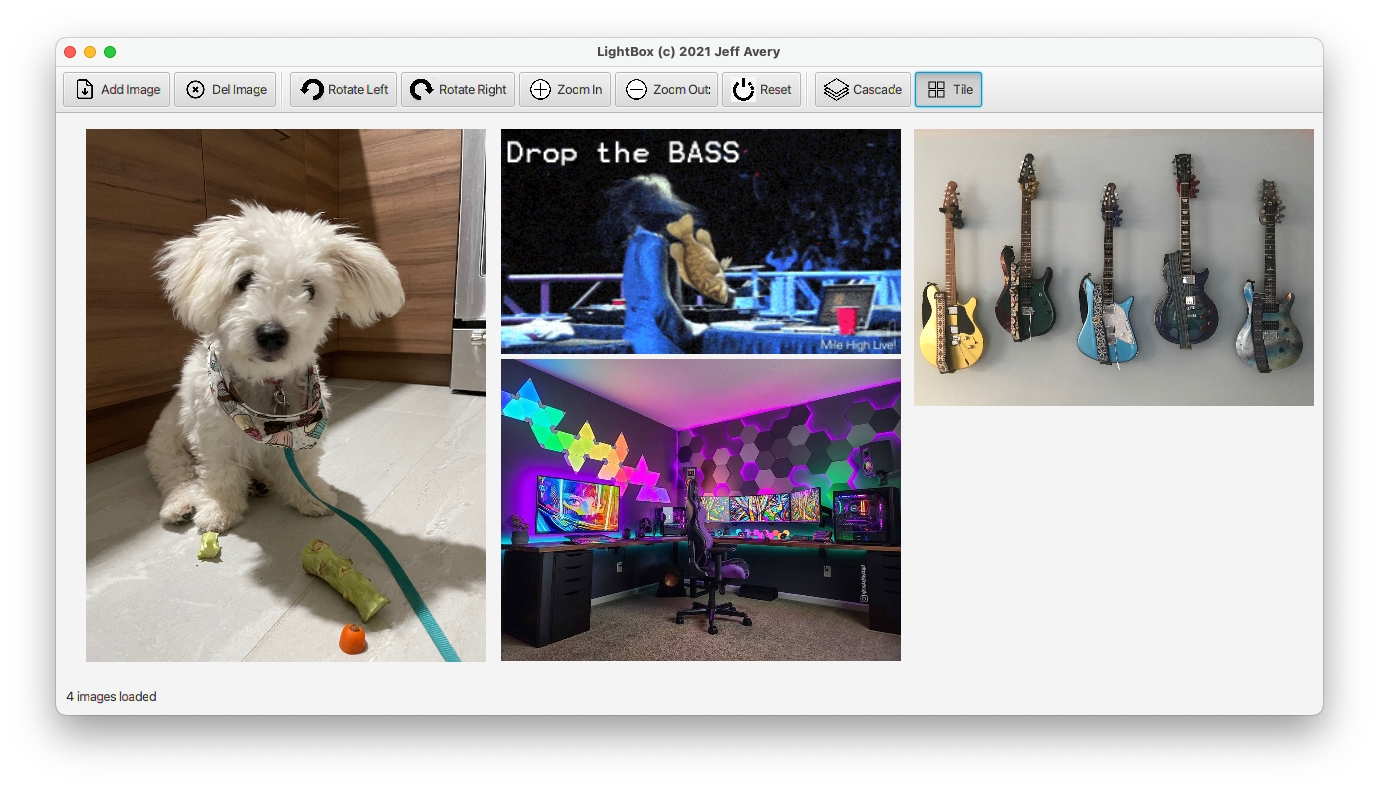
- Support two viewing modes: cascade, where images can be placed and positioned, and overlap, and tile, where images are automatically positioned side-by-side.
- Handle mouse and keyboard interaction, and support toolbar interaction.
- Utilize the Model-View-Controller paradigm.
The main area of your drawing program is a background where users can add photos.
- The window should include working minimize, maximize, and restore butons. The default window size should be large enough to accomodate several images, but not exceed 1600x1200. The window should be resizable, from a reasonable minimum size (that you should set and enforce) and a maximum of full-screen. See Tile and Cascade below for instructions on how resizing should work for each mode.
- The titlebar should contain the name of your program and your name.
- A status bar should show the number of images loaded, and any information that might be useful (e.g. the name of the selected image).
-
A toolbar should support the following functionality. All items require buttons with images and text.
Add new image: a file chooser will prompt the user to select a file. If they select a valid file, it should be loaded in a random position on-screen. All images should be scaled to the same size when loaded, and all scaling should be done proportionately (i.e. images should not be stretched and distorted as a result of this scaling operation).Delete the selected image. If no image is selected, this button should be disabled. If an image is selected and this button is pressed, it should immediately be removed from the table.Rotate left. The selected image should rotate 10 degrees counter-clockwise in-place every time this button is pressed (i.e. operations are cumulative).Rotate right. The selected image should rotate 10 degrees clockwise in-place every time this button is pressed. Successive operations are cumulative.Zoom-in. The selected image should scale-up (i.e. grow in size) by 25% every time this button is pressed. Successive operations are cumulative. Scaling should always be proportional.Zoom-out. The selected image should scale-down (i.e. reduce in size) by 25% every time this button is pressed. Successive operations are cumulative. Scaling should always be proportional.Reset. Return the image to it’s starting size and rotation. Do not change its position.
-
The
TileandCascadebuttons are Radio Buttons (i.e. Toggle Buttons) that allow the user to change the viewing mode. When the application is launched, it should be in Cascade mode, with all of the other functions enabled.
Tile automatically repositions the images so that they do not overlap. Changing from Cascade mode to Tile mode should remove any previous transformations that the user applied, and then translate all of the images to fit onto the existing screen as evenly as possible without overlapping. If there are too many images to fit in that space, then the excess images are added below and a scroll bar should become visible on the right-hand side.
Transformations cannot be performed in Tile mode. You should either (a) disable the transformation buttons when in Tile mode, or (b) automatically switch back to Cascade mode if the user activates a transformation in Tile mode. You can decide which approach is appropriate.
When resizing the window in Tile mode, you have a choice of ways to handle it. Implement one of the solutions below.
- Resizing in Tile mode should cause the images to reflow to fit the window size (e.g. if the user resizes the window smaller, the images should rearrange into fewer columns; if they make the window larger, the number of columns might increase). In no case should the images change size; or
- You add a horizontal scrollbar as-needed so that the user can scroll to see the overlapped images. The scrollbar would disappear when not needed.
Cascade allows the user to move slides and allows images to overlap. This should be the default mode when the application is launched. Changing from Tile to Cascade mode should not change the image properties, but should enable transformation capabilities so that the users can scale, rotate, translate freely.
When resizing the window in Cascade mode, you have a few choices on how to handle it. You can decide on which approach you want to use, all are worth full marks:
- You leave the images in their position, and if the window is resized in a way that would obscure an image, you add vertical or horizontal scrollbars. These scrollbars only appear when needed, and are otherwise not visible; or
- You can also choose to reflow the layout (similar to Tile above) so that an image remains visible if the window is made smaller.
- Finally, you can use some other solution as long as it meets the spirit of keeping content visible to the user (e.g. repositioning content to keep it on-screen).
Regardless of your approach, you should set and enforce a minimum window size to prevent the user from making the window too small to use. You can decide what is “reasonable” in this case.
- A background (table) is the focus of the interface, and is just an empty surface where the user can place photos. It supports the following interactions:
- Clicking on an image that is on the table will select it and bring it to the foreground. There should be some visual indicator which item is selected. Only one image can be selected at a time. Clicking on the table background will un-select a selected image.
- Dragging a selected image will move it. Translation should track the mouse, and should work regardless of whether an item is rotated or scaled.
In all cases, your UI should disable controls when they are not appropriate (e.g. if no image is selected, the operations should be disabled; if you select a shape, they become enabled).
Also, your application should be “well-behaved” in all circumstances. e.g. clicking cancel in a dialog, or selecting a txt file instead of an image should not result in an unrecoverable error. It is never acceptable to throw an exception instead of handling an error.
The following is a list of technical constraints and guidelines:
- The assignment must be programmed using only Kotlin 1.8 or later, Java JDK 17 and Java FX 18 libraries.
- You should use Gradle. Your application should build using
gradle buildand execute withgradle run. - The starting application window should be no larger than 1600x1200. The window should be resizable, and your interface should respond appropriately.
- Appropriate widgets should be selected and used for the interface. Options should appropriately enabled/disabled in the UI (i.e. if an option is unavailable, it should be disabled).
- You should use the Model-View-Controller paradigm in this assignment. [Hint: expect to have at least 2 views and 1 model, and multiple files to support this structure].
- You may use third-party graphics/images, provided that (a) they are licensed to allow you to use them in this way (e.g. Creative Commons), and (b) you comment their origin and license in your README file.
- You may use any sample code provided in-class (including on the class repository). If you do this, you must provide a comment in the code indicating the source of the code. If you use and fail to disclose this information, it could be considered an academic violation. You may not use any other third-party code unless you obtain instructor consent ahead of time.
Your directory structure for your assignment submission should be in subdirectories under your a2/ directory in your Git repository. It should use a standard file layout for a Gradle project. For example, your submission should resemble this (likely with slightly different class, image and sound file names). Note that you should NOT include the contents of the out/ folder (since they will be replaced when we build your project). Also, your project may or may not include a2.iml depending on whether you used IntelliJ.
    a2/
    ├── a2.iml
    ├── build/
    ├── build.gradle
    ├── gradle/
    ├── gradlew
    ├── gradlew.bat
    ├── readme.md
    ├── settings.gradle
    └── src/
        └── main
            └── java
                ├── CanvasView.kt
                ├── Main.kt
                ├── Model.kt
                ├── StatusBarView.kt
                └── ToolbarView.kt
            └── resources
                ├── add.png
                ├── remove.png
                ├── reset.png
                ├── rotate_left.png
                ├── rotate_right.png
                ├── zoom_in.png
                └── zoom_out.png
Your submission needs to include:
- All source code and resources required to build and execute your program.
- A Gradle project that compiles and runs your assignment.
- A
readme.mdfile with any details required to help the TA grade your assignment.
Your readme.md file needs to include, at a minimum:
- Your name,
- Your student number,
- The version of Kotlin that you used,
- Your operating system & version,
- The source for your image and sound assets,
Your submission will be assessed roughly as follows:
- 50% Functional requirements, described above
- 5% Insert image: image is correctly chosen and loaded using file chooser.
- 5% Delete image. Selected image can be deleted and is removed from table.
- 10% Scale. Can scale up and down (and other operations work afterwords).
- 10% Rotate. Can rotate left and right (and other operations work afterwards).
- 10% Select. Can select an image. Visual indicator that it is selected. Can unselect. Selected image is brought to foreground.
- 10% Translate. Can move selected image around the table.
- 50% Common UI requirements
- 5% Titlebar contains program name and username.
- 10% Window is resizable. Content scales as described. Min/max/restore buttons work.
- 5% Toolbar contains both text and buttons.
- 5% Statusbar reflects number of images.
- 10% MVC is used, with a minimum of 1 model and 2 views.
- 15% Tile and Cascade modes supported as above.
- May 12, 2023. First draft.